Working with Azure Functions and the Azure API Management (APIM) offering
 Brian Gorman

2020-12-04 11:11 pm #FestiveTechCalendar
Azure Functions and APIM
In this walk-through, you will be guided through securing your Azure Functions so that a random user can’t just execute your functions, even if they have the function key and full function URL. Therefore, by the end of this walk-through you’ll have more security available than what you would get from just using a function key alone.
The overarching goal is to create your public-facing Application Programming Interface (API) in such a way that you can leverage Azure Functions without the functions being open to the world, and then you can use Azure API Management (APIM) as a public-facing facade to let specific customers into the appropriate APIs.
With APIM, you will not only be able to expose your own APIs as needed, but you can also route users to a third-party API without them even knowing you are using the third-party API, if you need to do so. Even if the customers do know that you are using a third-party API, all they need from you is one URL to access all of the APIs you need to expose to them. This also protects the customers from having to know what your third-party API key is, since they will never need to call the third-party API directly.
APIM also has additional gains when it comes to dealing with bad players. With APIM you can easily throttle users on an API. If you use a plan other than the consumption plan, you can further throttle the API by specific IP or subscription key. This functionality won’t be covered in this walk-through, but you will be set up to use it if you want to go deeper in the future.
Festive Tech Calendar
This walkthrough is featured in day 6 of the festive tech calendar!
Watch the video of me working through this walkthrough here: Festive Tech Calendar [day 6]: Azure Functions and APIM
More info about the Festive Tech Calendar
Getting started
To get started, you will need the following:
- Visual Studio 2019 Community (or better)
Visual Studio 2019 Download
or Visual Studio Code (not covered in this walk-through, but useable) Visual Studio Code Download. - Azure Functions tools for local debugging (optional for this walk-through. If you do not have the tools you will want them for local debugging. You can get them by making sure you install them with the Visual Studio installer - Azure development workload).
- An Azure Account with ownership on the subscription.
- PostMan, another API tester, or an ability to run curl commands
Create a simple Azure Functions Function App
To simulate your current functions at Azure, for use in this walk-through you’ll just use a simple function app. This function app will contain a couple of simple functions so that you can see a few of the features of APIM later in the walk-through.
- Create a function app with a couple of functions. To begin, open Visual Studio 2019 and create a new Azure Function app.
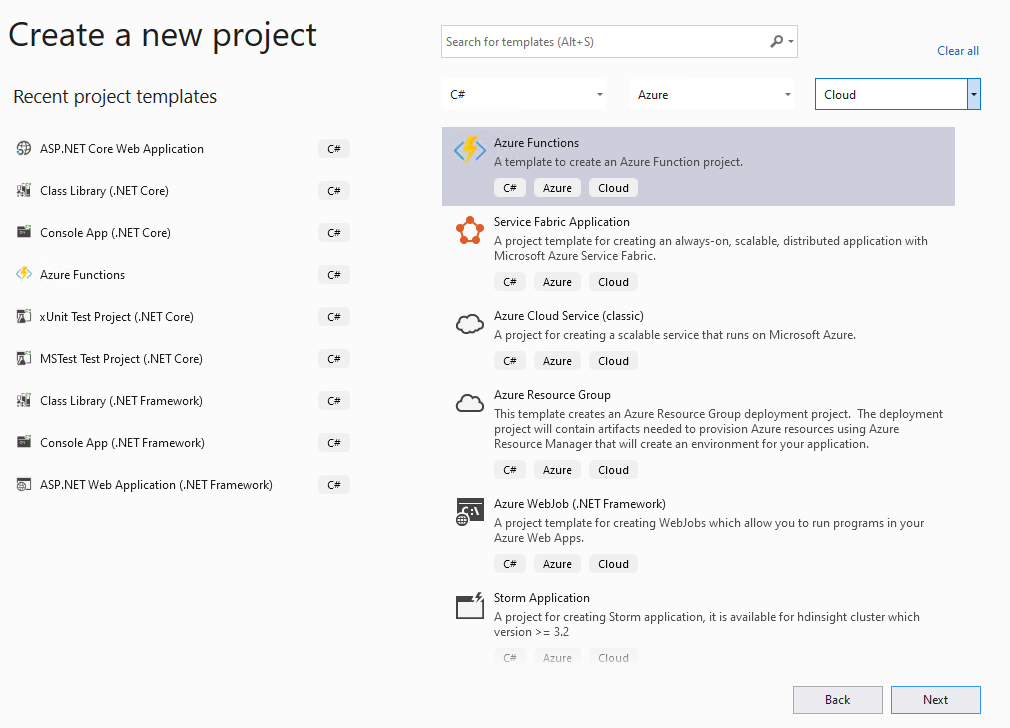
Select the Function App Template to create a new function app project Name the Function app something like SimpleFunctionsSimpleFunctionsSelect a folder that makes sense to you for storing the function app, then hit theCreatebutton.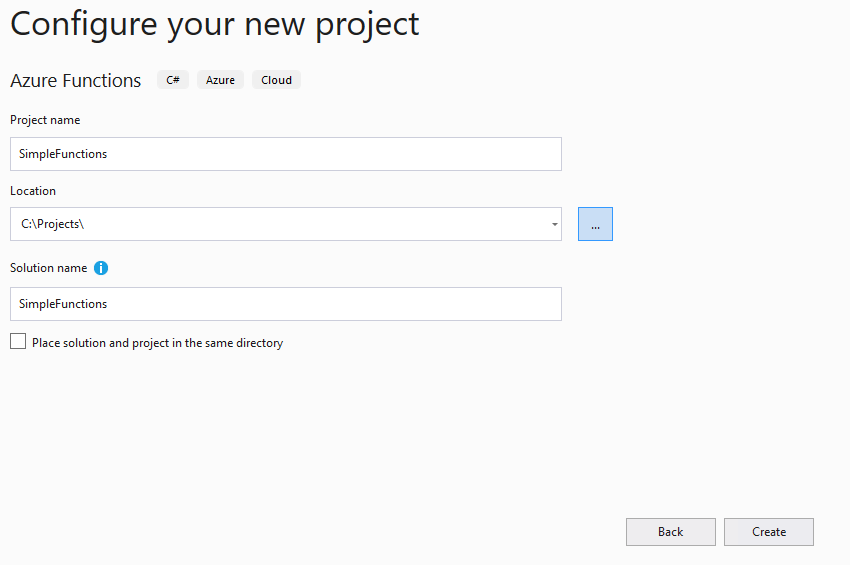
Create the function app Leave the defaults to choose anHttp Triggerand use theStorage emulatorand give the function an authorization level ofFunction.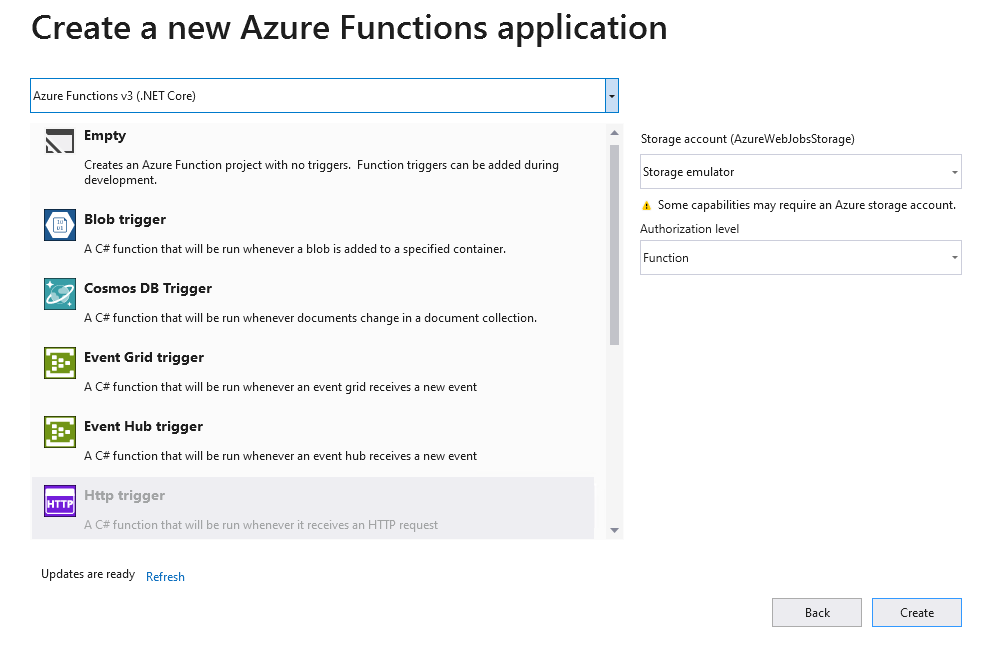
Leave defaults set to create an Http triggered function with function authorization level Once the app is created, rename the first function toSimpleAuthorizationFunctionby right-clicking on theFunction1.csfile and renaming:SimpleAuthorizationFunctionMake sure to also update the FunctionName attribute to reflect the new name.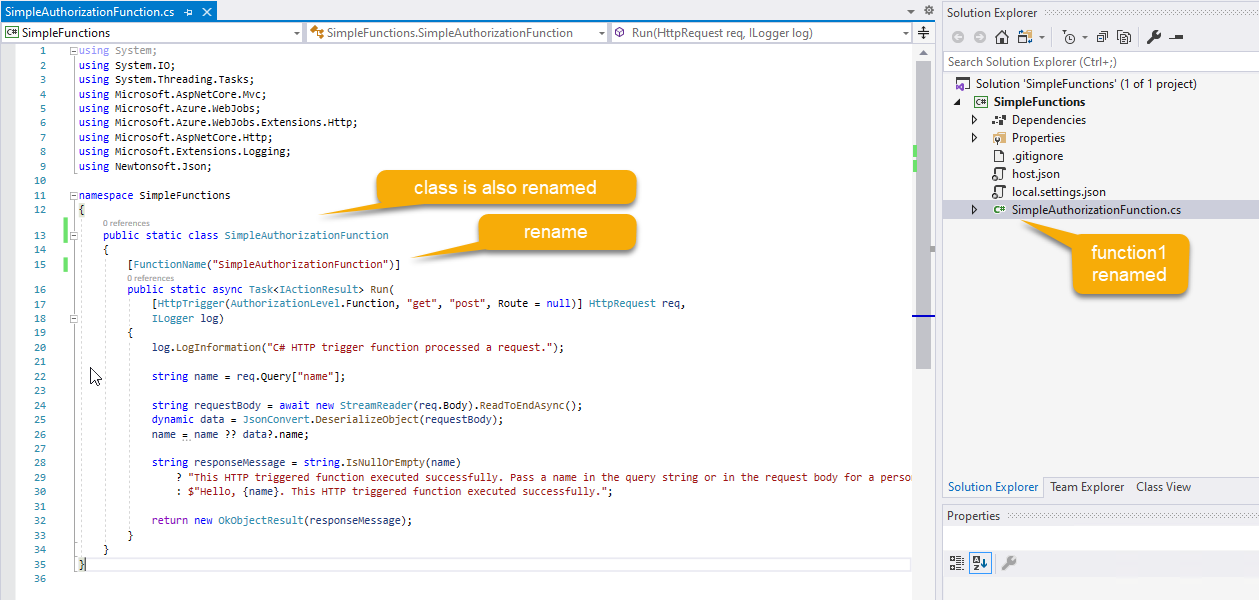
Rename the default function Add a second function by right-clicking on the project and selectingAdd -> New Azure Function.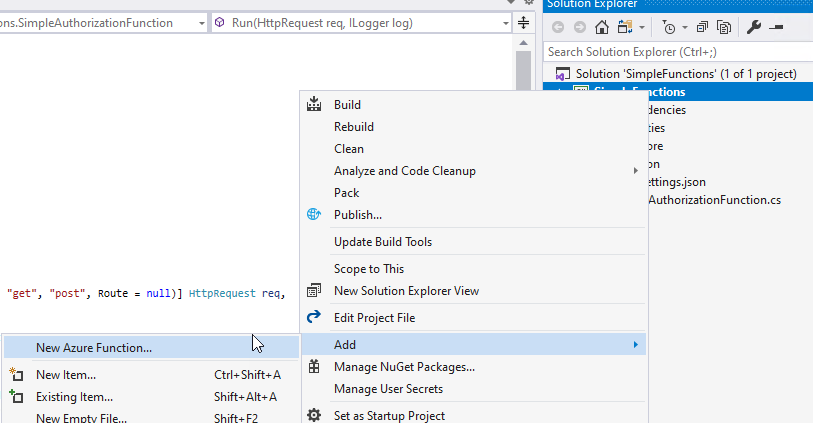
Create a second function Name the functionSimpleAnonymousFunctionSimpleAnonymousFunctionFor this function, chooseAnonymousauthorization and anHttp Trigger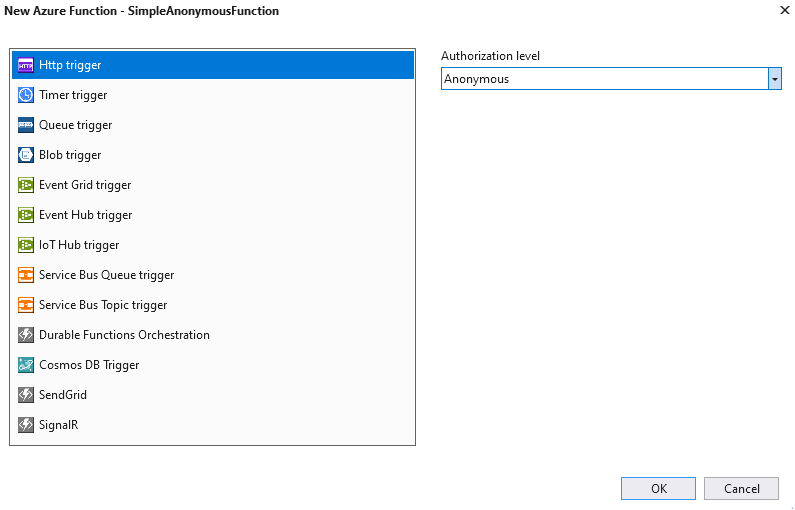
Choose HttpTrigger and Anonymous At this point you should have two functions, one with a function key and one without.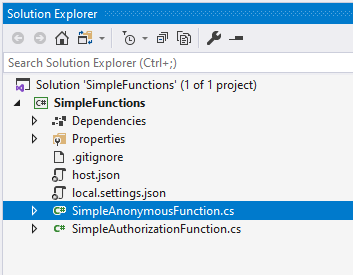
Current Solution Explorer - Test the functions. Run the project to test the two functions locally. There is no sense in pushing to Azure if they do not work locally. Note that both function URLs are listed in the output for the terminal:
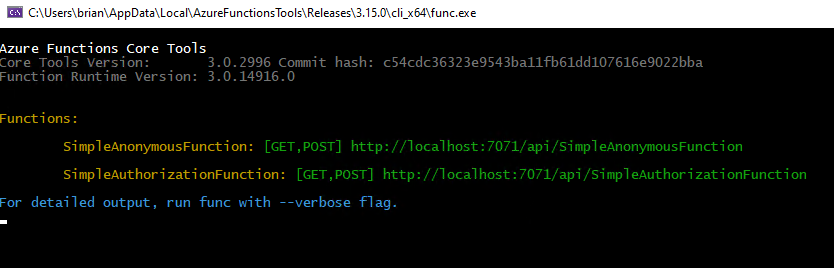
Current Solution Explorer Executing the anonymous function is working as expected when navigating to the url:http://localhost:7071/api/SimpleAnonymousFunction?name=brian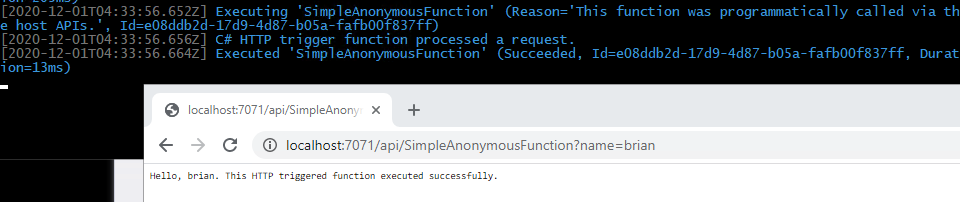
Executing the anonymous function The other function will work as well, even without a key, while being run locally. Feel free to test it if you desire. - Provision resources at Azure. Now that your function app is ready to go, you should deploy it to Azure. To do this, first you must provision a couple of resources. This demonstration will use the Azure Cloud Shell. Feel free to just create the appropriate resources however you choose at Azure. You will need:
- Resource Group
- Storage Account
- Consumption based Function App w/plan
Azure Cloud Shelland selectBashas the terminal. When the terminal is connected, run the following command [note: you should change the location to a region near you [az account list-locations –query “[].{Name:name}” -o table]]:rgname="azurefunctionsandapim" echo $rgname loc="centralus" echo $loc az group create --location $loc --name $rgname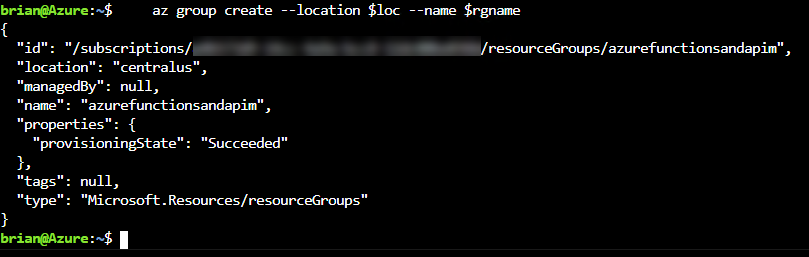
The resource group is created Once the resource group is created, add a new azure function app to the resource group by executing the following commands:storagename="afandapimstor$RANDOM" echo $storagename az storage account create --name $storagename --location $loc --resource-group $rgname --sku Standard_LRSThis will create your storage account for the Azure Function App.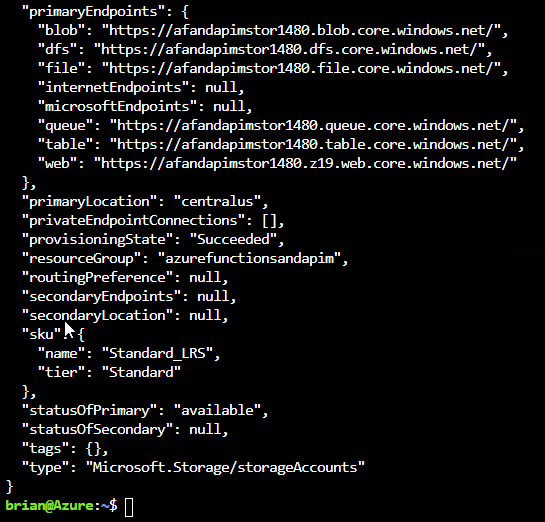
The function app storage account is created Now create the function app with the following commands:fAppName="afandapimfa$RANDOM" echo $fAppName az functionapp create --name $fAppName --storage-account $storagename --consumption-plan-location $loc --resource-group $rgname --functions-version 3NOTE: Make sure your function version matches what you created in Visual Studio (likely 3 at this point).
This will create everything you need to deploy the app. Browse to the resource group to see all of the provisioned resources.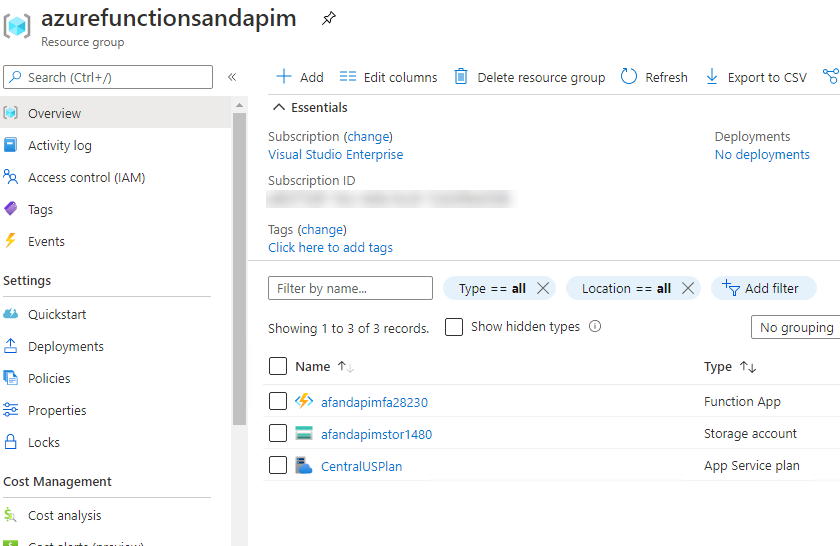
The function app is created, resources exist as expected in the resource group - Deploy the function app. Return to Visual Studio, and make sure the project for your function app is still open, then select
Build -> Publish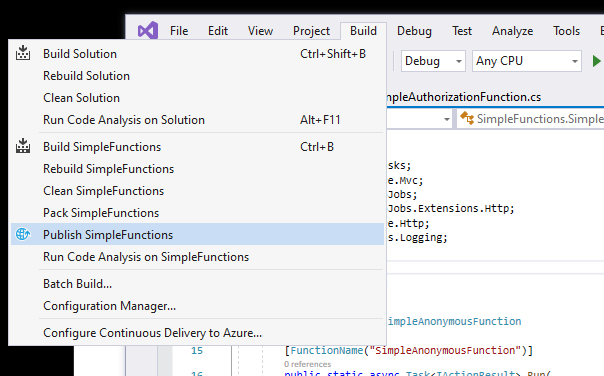
Publish the web app SelectAzureandNext.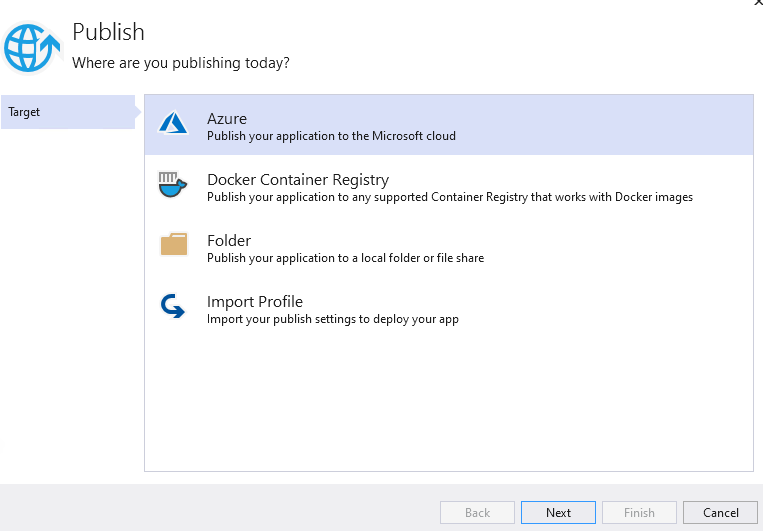
Publish to Azure SelectAzure Function App (Windows)andNext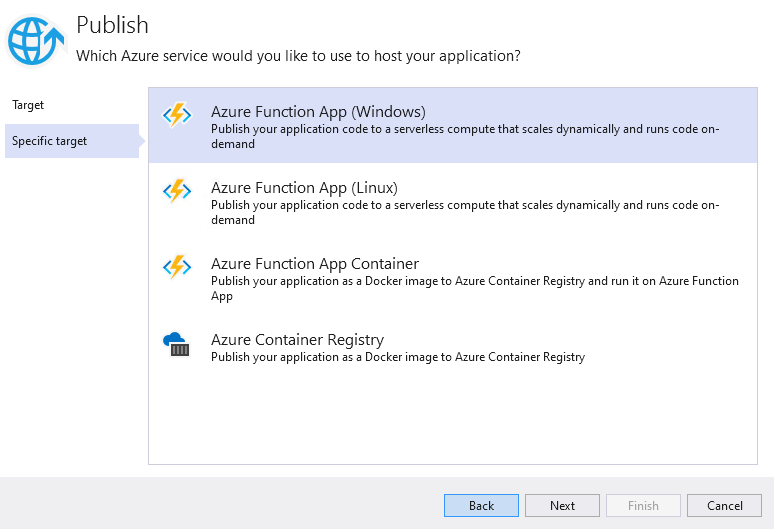
Select Azure Function App (Windows) Choose your subscription and the appropriate resource group and function app, then hitFinish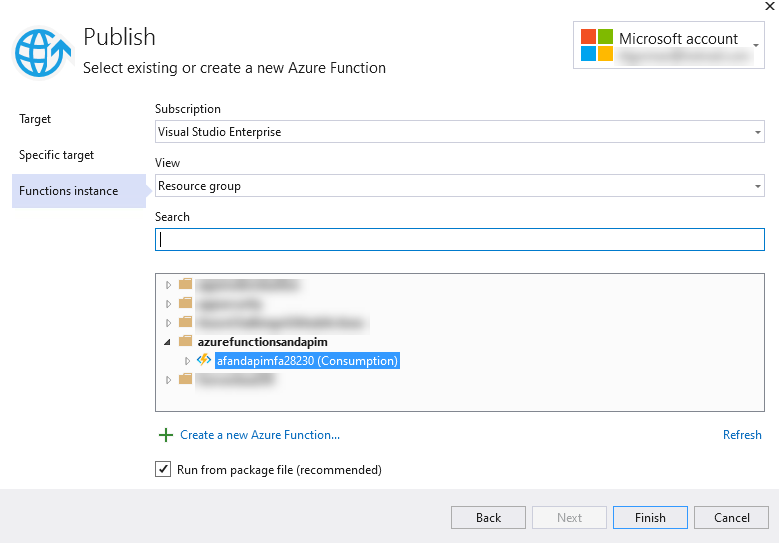
Select the appropriate function app to deploy to Ignore the missing dependencies and hitPublish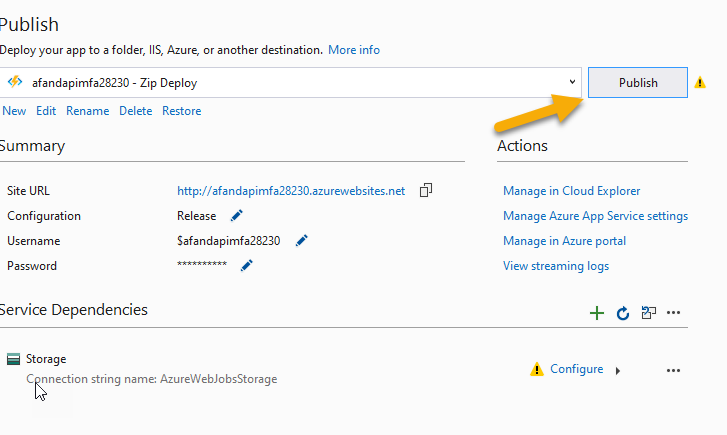
Publish it After some time, the function app will publish and be available at Azure. This is a good time to go get a coffee. - Review the function app. Return to the Azure portal. Browse to the
Functionsto see that everything deployed as expected.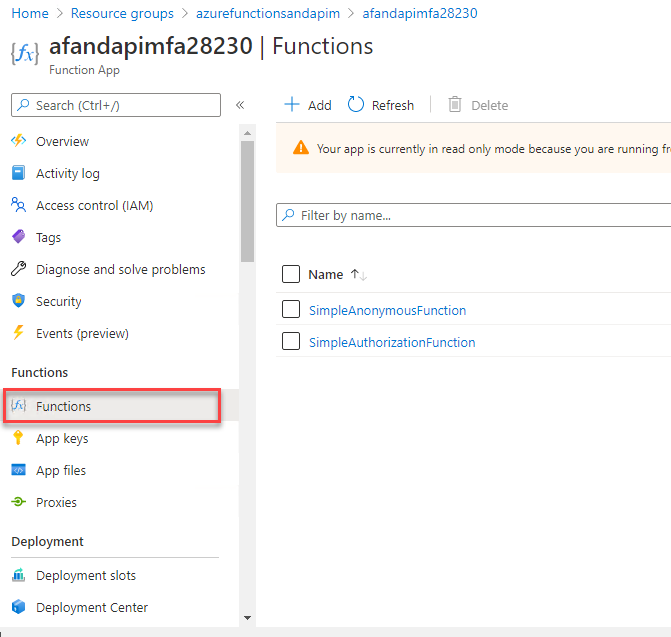
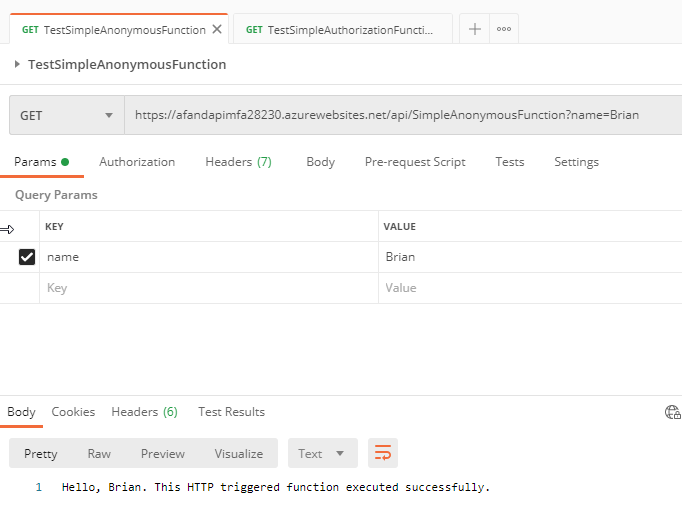
Review the function app functions Click on theSimpleAuthorizationFunctionto navigate to the function in the portal. Once there, click onGet Function URLto get the URL for the public-facing function.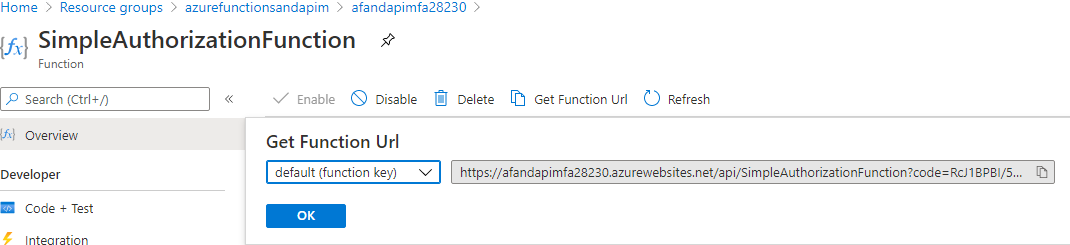
Review the function app functions Copy the function URL and open it in a browser. Add the&name=yournameto the end to see that it is working as expected.https://afandapimfa28230.azurewebsites.net/api/SimpleAuthorizationFunction?code=RcJ1...&name=brian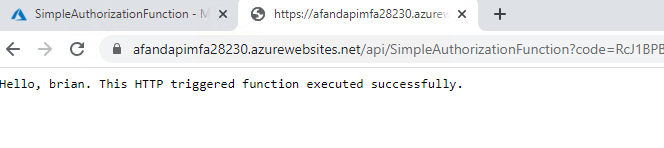
The function works as expected - Execute the functions from PostMan. Open your local instance of Postman or whatever client you will use to test your APIs. This tutorial will focus on the use of Postman. Create two function calls - one to each function, using the function URL from the portal for each
Calling the functions from PostMan Once you are satisfied that the functions are working and you can call each through Postman, you are ready to move to the next section.
Secure the functions from public execution
The functions are publicly-exposed, so anyone with the key can execute them. In this task you will lock the functions down so that only authenticated users can execute the functions.
In the previous step, you’ve already proved that the functions are public, because they are accessible from postman. Now you need to lock them down.
- Make the functions require authorization. Return to the function app in the portal, and select the
Authentication / Authorizationoption underSettings.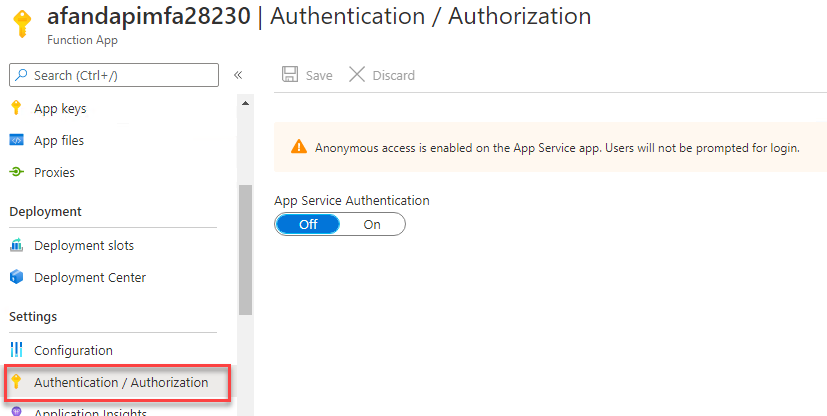
the Authentication / Authorization option is open for the function app Turn on theApp Service Authentication. Then selectAzure Active Directory. This will open theAzure Active Directory Settingsfor the function app.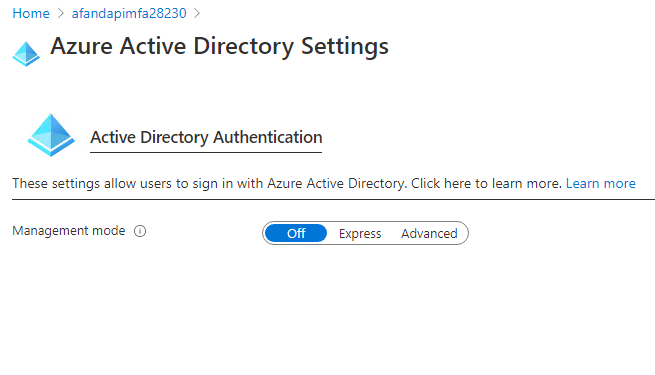
The Azure Active Directory settings window is open When the window comes up, selectExpress. Then save with the default settings by hittingOK. If you already had an AD App, you could select it here, but you likely don’t, so you need to create a new one.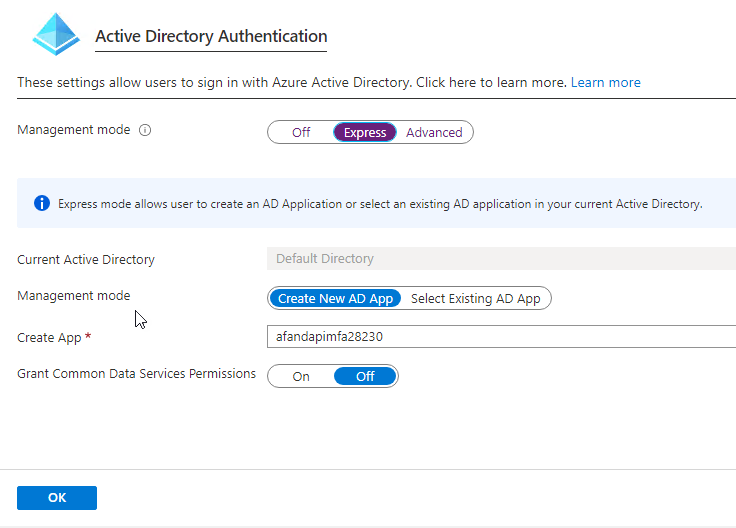
Creating an AD application After hittingOK, you’ll return to theAuthentication / Authorizationwindow. Make sure to hitSaveto actually save the application settings.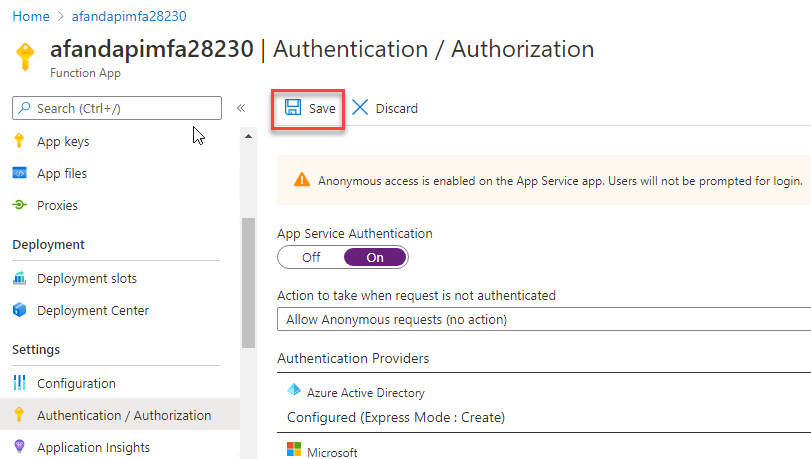
Make sure to save the changes This will create the app. However, you will want to go back into the settings and update to anAdvancedinstance. Navigate away from the function app by going to the home directory at azure or going to some other resource, then come back to the function app. Select theAuthentication / Authorizationoption again, then change Active Directory toAdvanced. This will show you the Client ID and secret. Make a note of the Client ID and secret for use later in this walk-through.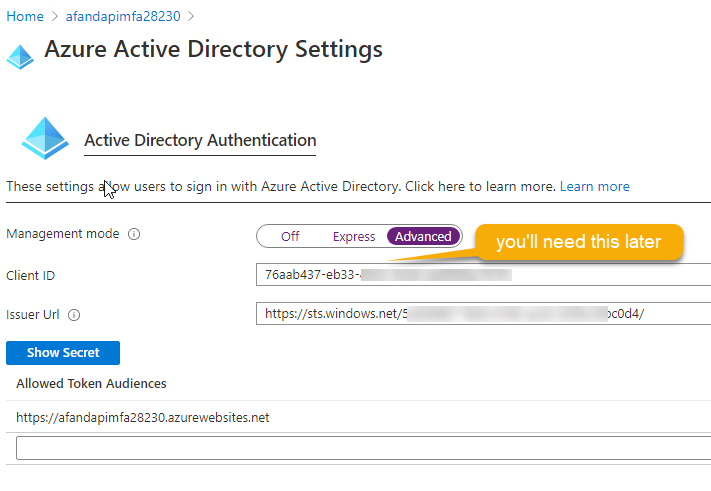
Get your Client ID for later use Make sure to hitOKandSaveagain, so that your changes are applied. As a final step, make sure to selectLog in with Azure Active Directoryin theAction to take when request is not authenticateddropdown.
Make sure all requests are authenticated Make sure to save the page one last time. Your functions are now protected. - Prove the functions are locked down. Return to your Postman or other api query client, and attempt to execute your functions as before. If everything is set correctly, you will get a
401 - Unauthorizederror on execution of the function.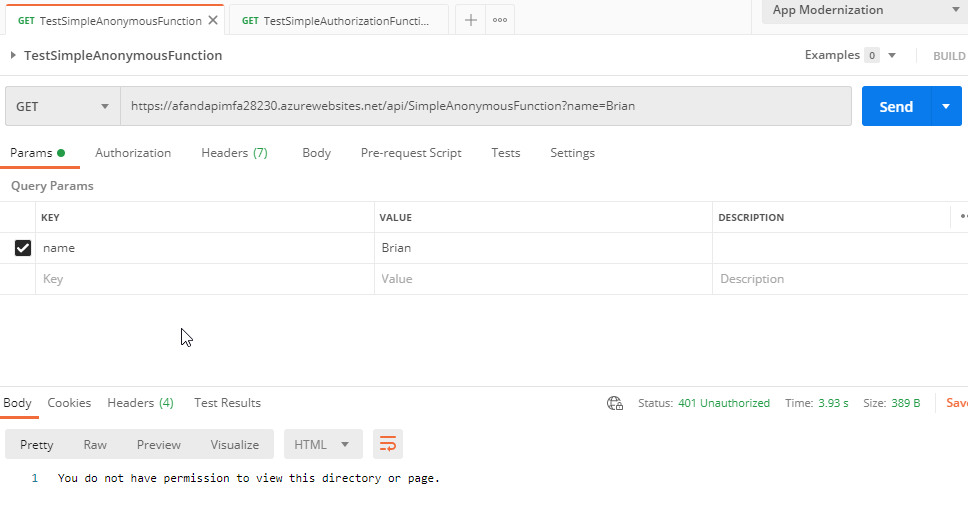
The functions now respond with a 401 if the user is not authenticated
Create the APIM
In this task you will create the APIM that you will use for your public-facing facade. You will then create a couple of APIs to separate functions so you can see how the different subscriptions can give access to different clients.
After creating a couple of APIs, you will create a couple of Products, each having one or more subscriptions.
- Create the APIM instance. To start, you will need to create a new APIM. To do this, use the hamburger to
Create a Resource.
Create a new resource EnterAPI Managementand select it when it pops up in the dropdown.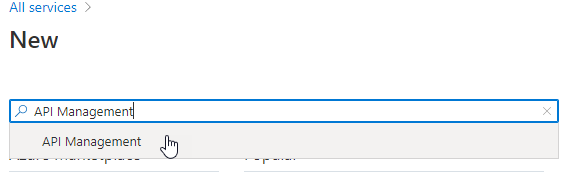
Searching for API Management Then hit theCreatebutton.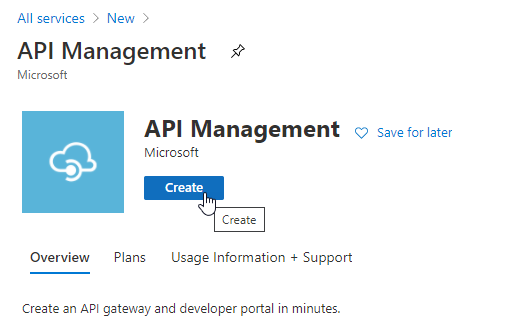
Start the process to create the new API Management Select the appropriate subscription, resource group, region, and name the resource something that makes sense to you for your public-facing api, such as:mypublicapiEnter whatever you want for the organization name, and your email for administrator email. Select theConsumptionplan in the drop down (Consumption will spin up quickly, others take somewhere around 45 minutes to provision). In the end, you should have settings similar to what is shown here:
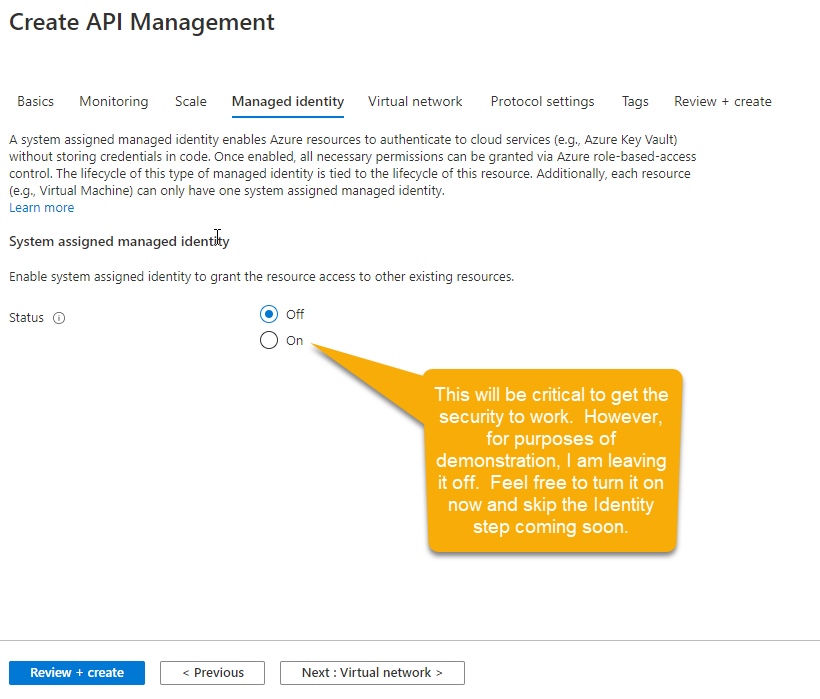
Settings for creating the APIM instance On theMonitoringtab, you will likely want to have Application Insights enabled in the real world. For this, you don’t need it. In my instance, I am turning it on and using the same AI instance that is being used by my function app. This is also likely not ideal as you probably don’t want to mix and match these resources into the same AI instance.IMPORTANT: In order for this APIM to communicate with the Azure Function App, you need to make sure that this APIM has a managed identity. You can enable that now during creation. In case you forget or didn’t do this, the way to do this will be covered shortly. For the demo, I’m leaving it unchecked on purpose.
You do want your APIM to have a managed identity Leave the other settings. Feel free to mess around with the protocols if you want to. I am leaving them all to the default ofofffor this demo - even though this may not be totally feasible in the real world, it should be the safest. Review and Create the APIM instance. This is another opportunity to get a coffee. If you selected a version other than theConsumptionplan, you should probably go to lunch. The APIM should be up in about 3-5 minutes. When the deployment completes, you can go to the resource group and drill into the APIM, or you can search for it by searching for API Management Services in the top search bar. Either way, find the APIM you created and navigate to it.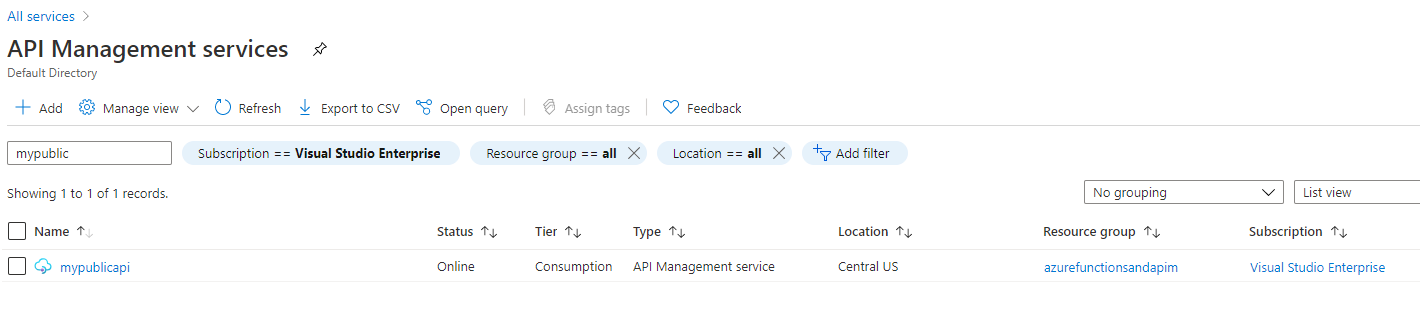
API Management Services lists your APIM instances Once you are in the APIM Instance, notice a few things. The important points are the menus on the left forAPIs,Subscriptions, and theGateway URLwhich is named after the name you put in for the APIM instance. Additionally, another important menu isManaged Identitieswhich is not shown, but is in the left menu underSecurity.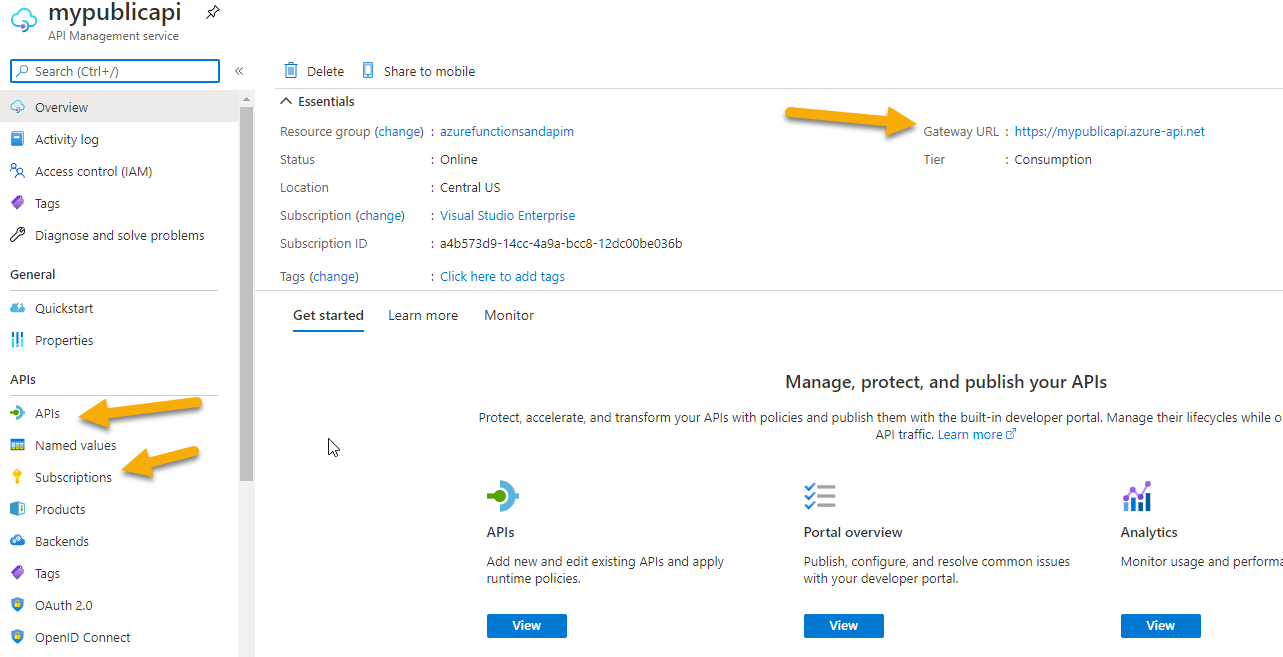
Reviewing your APIM instance - Create the APIs to leverage your functions. Ordinarily, you would likely have many more than two functions, so having multiple APIs would make sense. For this demo, you’ll create two APIs. The first will have only the anonymous function, and the second will have both. Begin by hitting the
APIsoption in the left menu.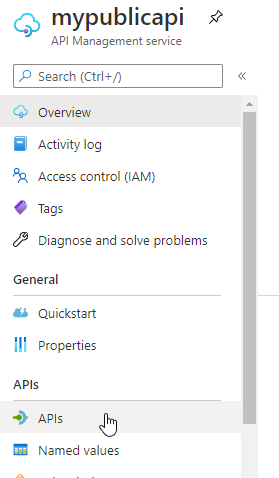
Creating an API Once you’ve selected the API, use theFunction Appoption to select the function app for use in the API.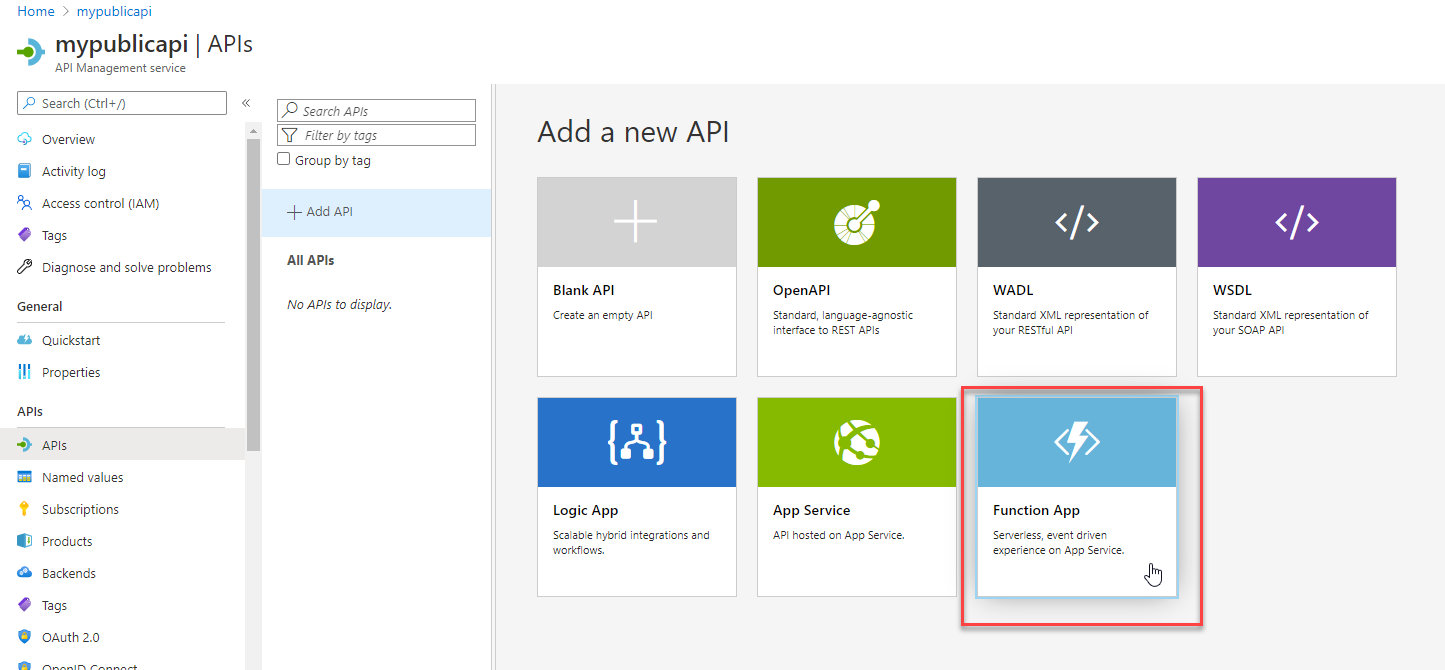
Use the function app option Use the browse button to select your function app.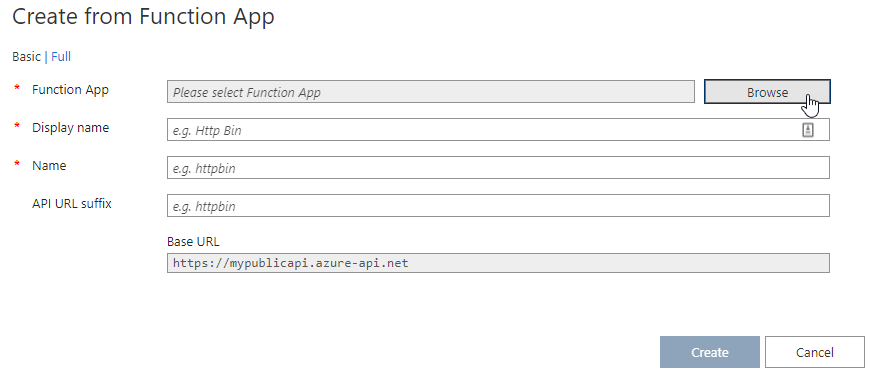
Browse to select your function app Select your function app, then you will get to choose what functions to include in this connection.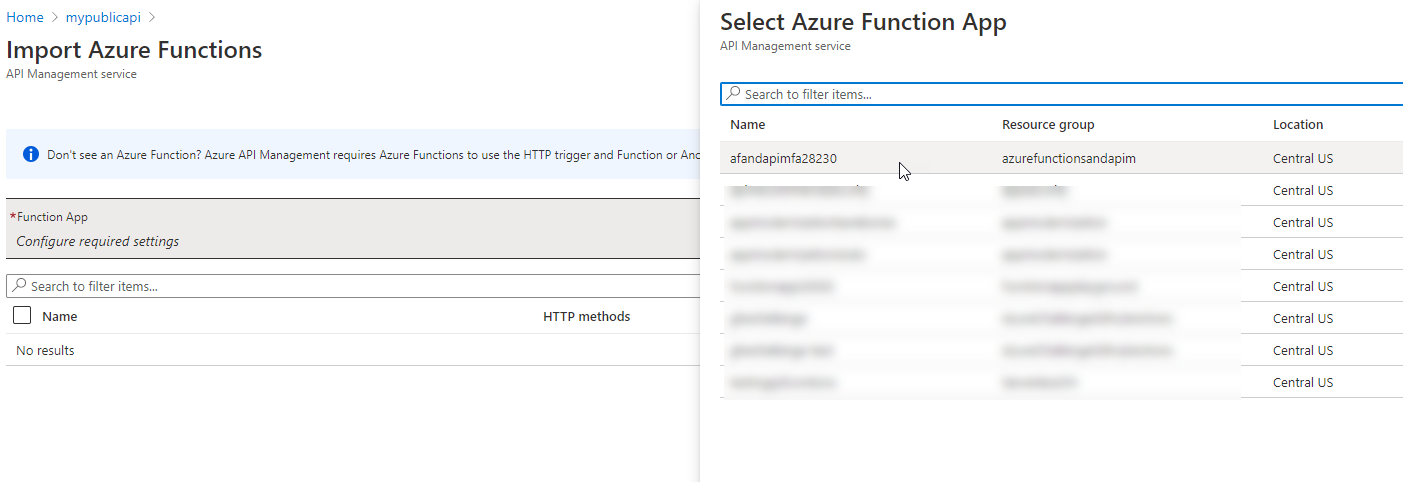
Select your function app Then choose the appropriate functions. For this one, let’s simulate that the Anonymous function is one that we really just want to open up to a lot of people, and the one with the function key is really for preferred or customer clients (yes, it’s contrived, forgive me). Uncheck theAuthorizationfunction. Then hitSelect.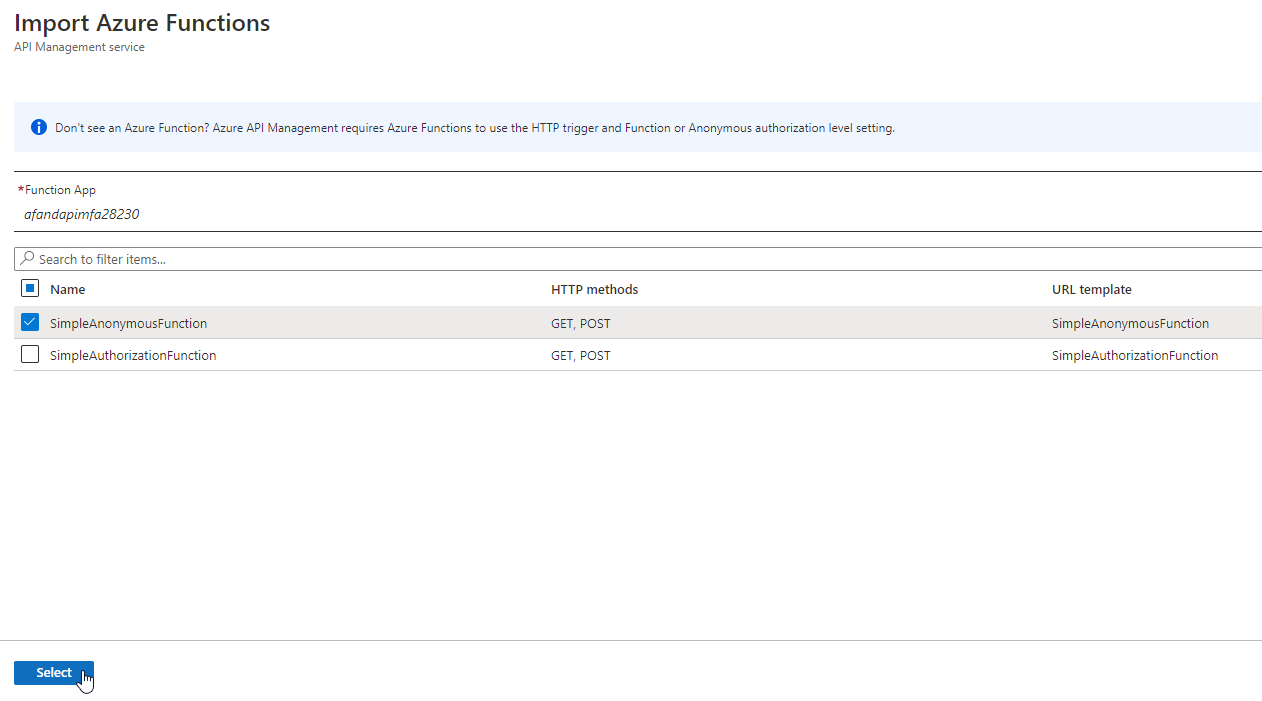
Select your function app When you return to the page for creating the API, change the Display Name to something likeAllPublicDataAlso change the API URL suffix toPublicThen hit theCreatebutton.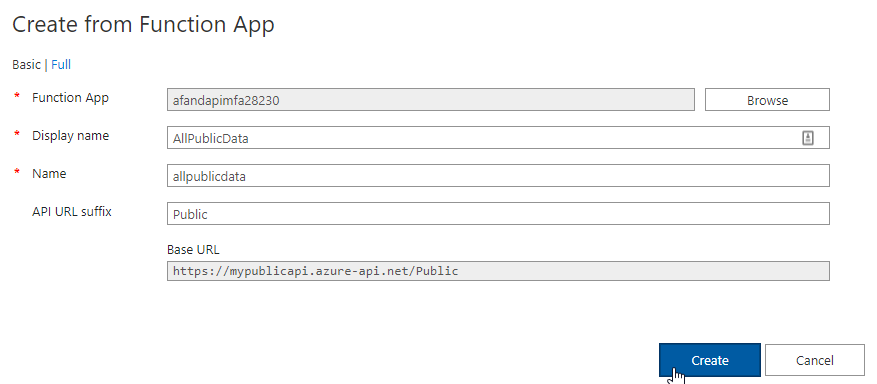
Creating the All Public Data API Once this API is created, you can review the API and the Operations.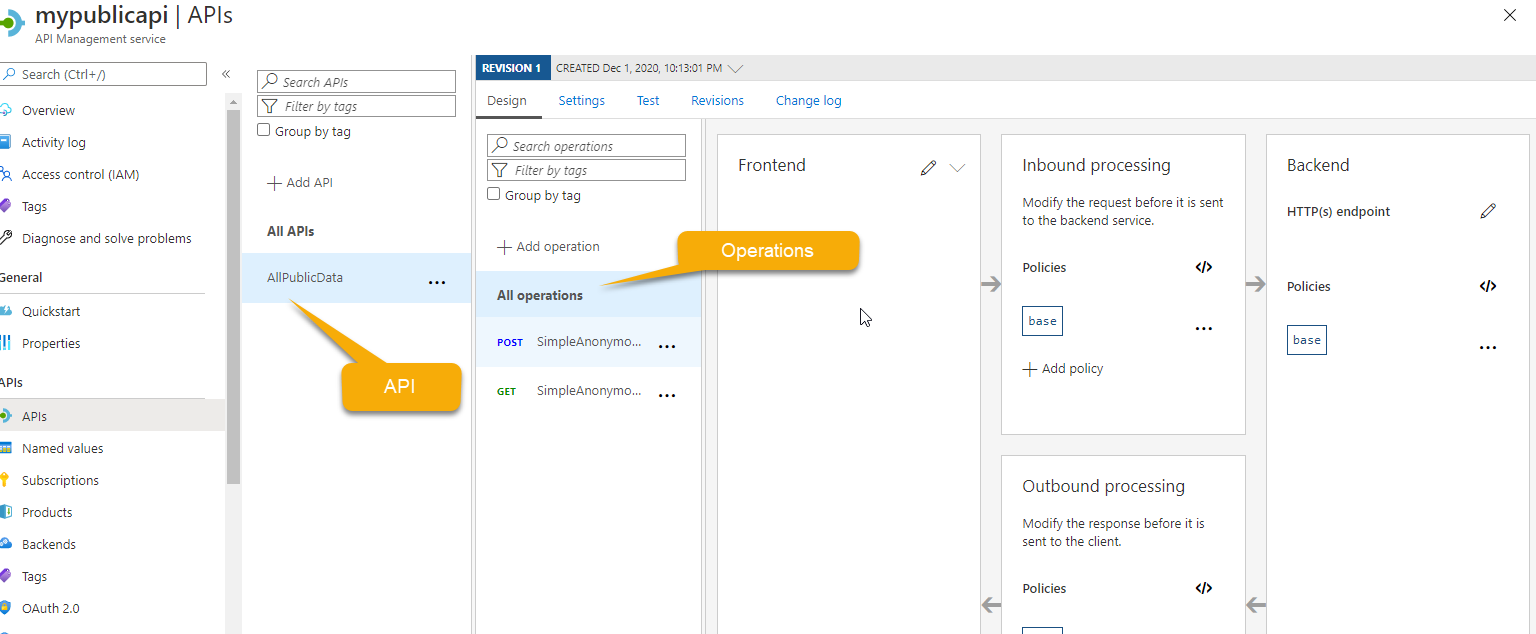
Reviewing the API Select theGETmethod, and then hit theTestbutton at the top.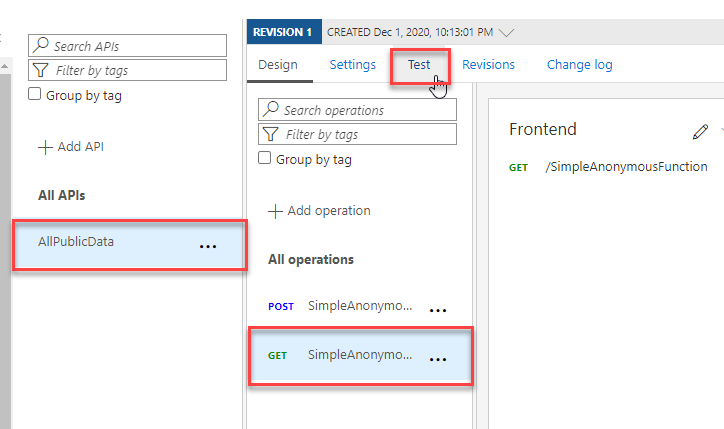
Starting the test process Once you have the test window open, hit theSendbutton to send a request.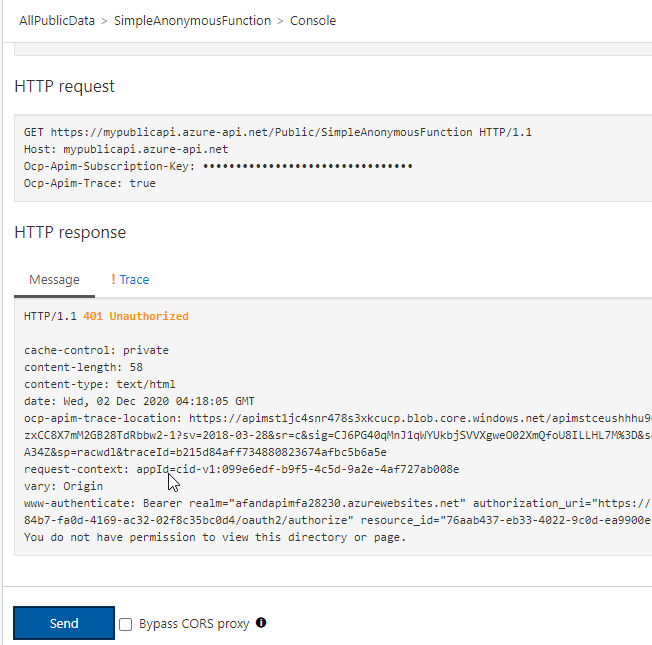
Testing reveals the function call is still unauthorized As you can see the function call is still unauthorized. This is a good thing, because your APIM is not currently telling the Function App who it is and that it should be authorized. - Repeat step 2 for the AllCustomerData API. Using the same steps, create a new API that is called
AllCustomerDataUse the URL SuffixCustomerUse the same function app and include bot of your available functions. As before, none of the functions will be authorized, but the API is in place.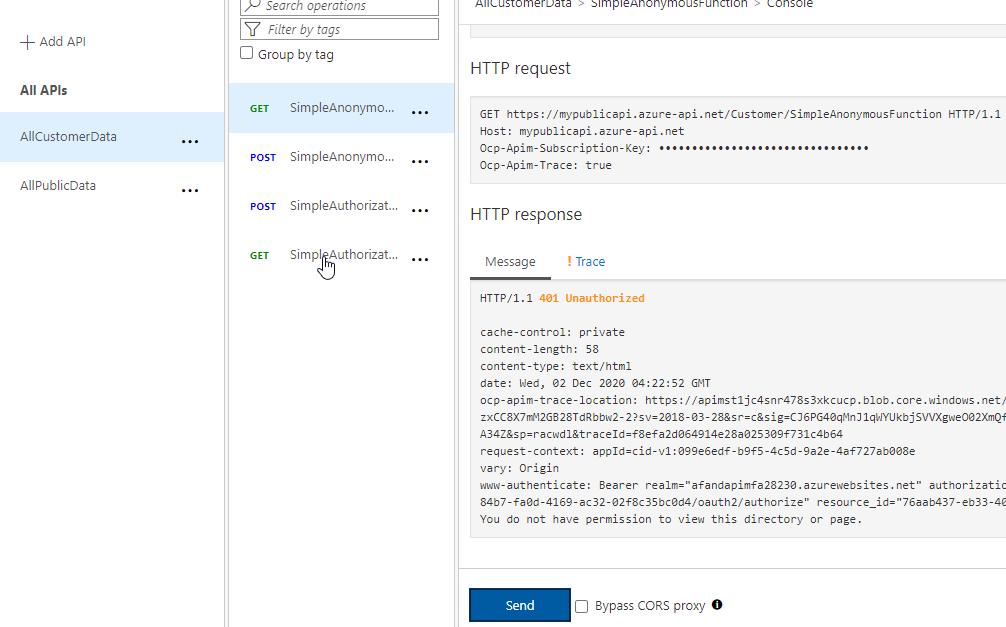
Testing the Customer API also reveals the function call is still unauthorized - Create a couple of products. Ordinarily, you would have APIs that are exposing separate apps and even third-party APIs. In this demo, you’ve simulated this by splitting your own app into two different APIs. This also simulates what it might be like if you had multiple function apps or APIs in play in a real solution. In addition to creating different APIs, you can create products that expose various pieces of the puzzle. A product can further limit what a customer can see, and can be all of one API, part of one API, or parts of multiple APIs. You can design the products to fit your customers’ needs. For this demo, you will create two products. One that is for the
Publicdata, exposing theSimpleAnonymousFunctionfrom theAllPublicDataAPI. The second product will expose theCustomerdata, with access to both of the methods from theAllCustomerDataAPI. You could create an additional product to span both APIs, if you needed to do so. Create a new product by hitting theProductsoption in the left menu. Then hit the+ Addbutton at the top.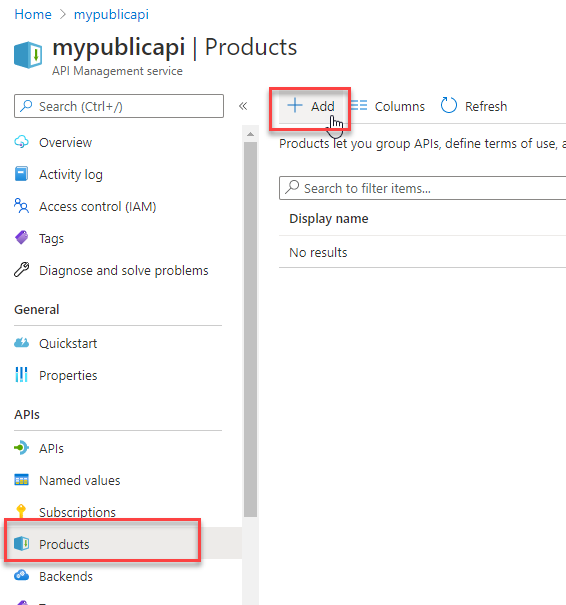
Starting to add a product For the display name use something that makes sense for public data, but don’t use the same name as the API. For exampleUnrestrictedGive it a description likeThis is the Public Data ProductSet it toPublishedand leave the check boxes forRequires subscriptionchecked andRequires approvalunchecked. Then hit theSelect APIbutton For this one, only select theAllPublicDataThen hitCreate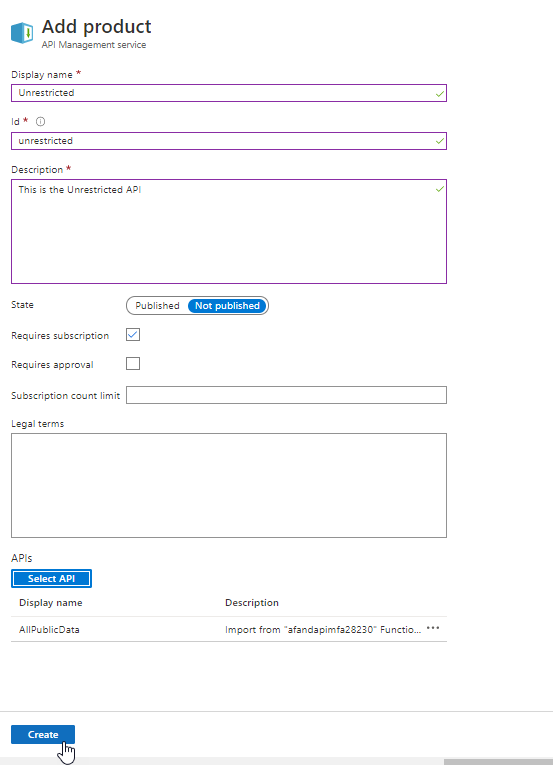
Creating the first product Add a second product, repeating the above options, but this time select theCustomerAPI. Call this new APIClientAdditionally, make sure that this product also requires a subscription to be able to be used.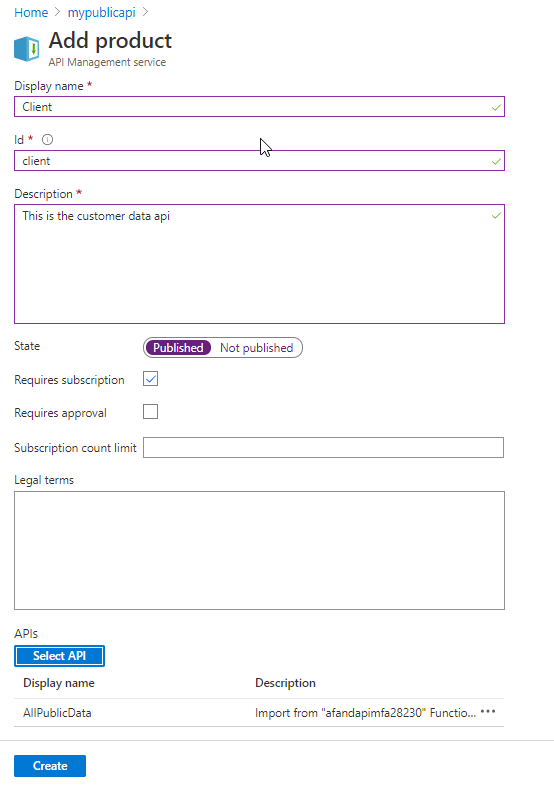
Adding the client product I accidentally forgot to publish the Unrestricted, so I can easily do that now using the ellipses on the far right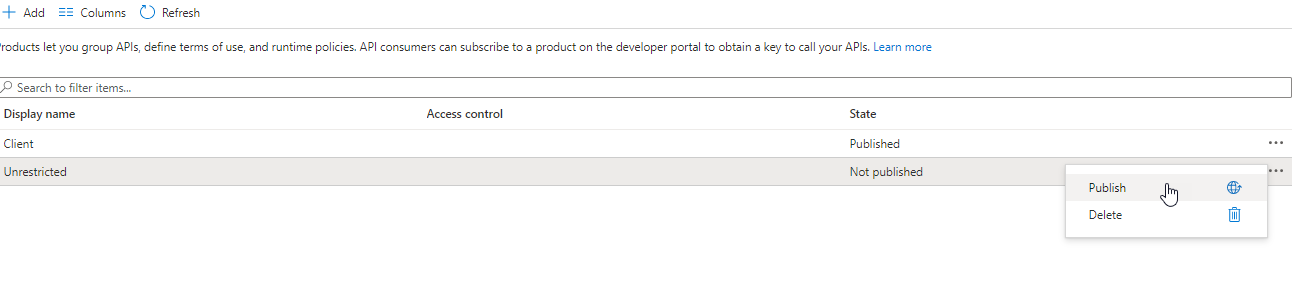
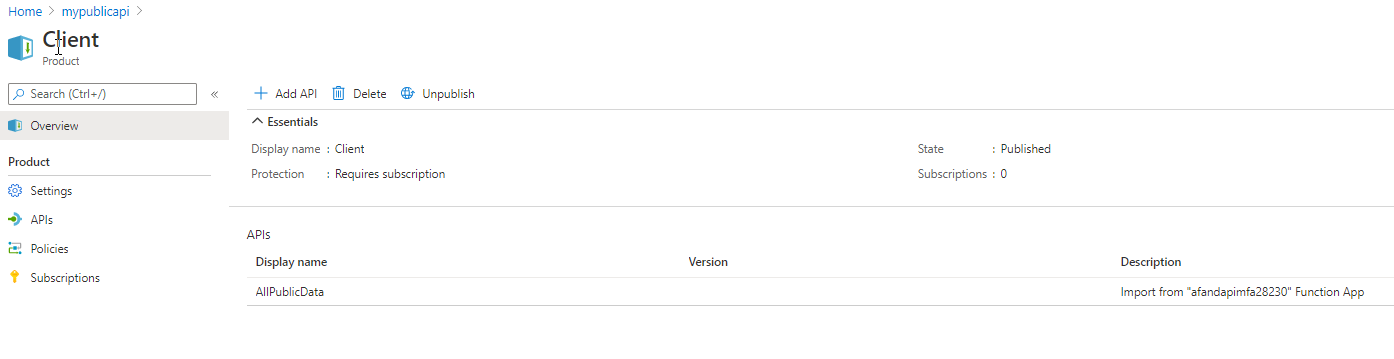
Publishing a product - Create a couple of subscriptions. Products are great, as they give you a way to be able to separate the APIs that you want various clients to have access to. However, in the previous step you set the products to require a subscription. Drill into the Client product by clicking on it. Note that on the left you can alter Settings, APIs, Policies, and Subscriptions. Select the Subscriptions tab.
Reviewing a product Next, select+ Add subscriptionand create a new subscription with the namePremiumClientAnd the display namePremium.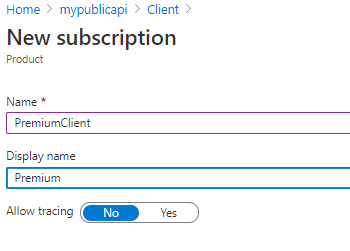
Creating a subscription You could create multiple subscriptions here, and in various APIM instances you can throttle or do other actions based on the subscription. Note that the subscription has keys. Use the ellipses on the right to reveal the keys, then copy one of the keys to your clipboard and save it somewhere for use later.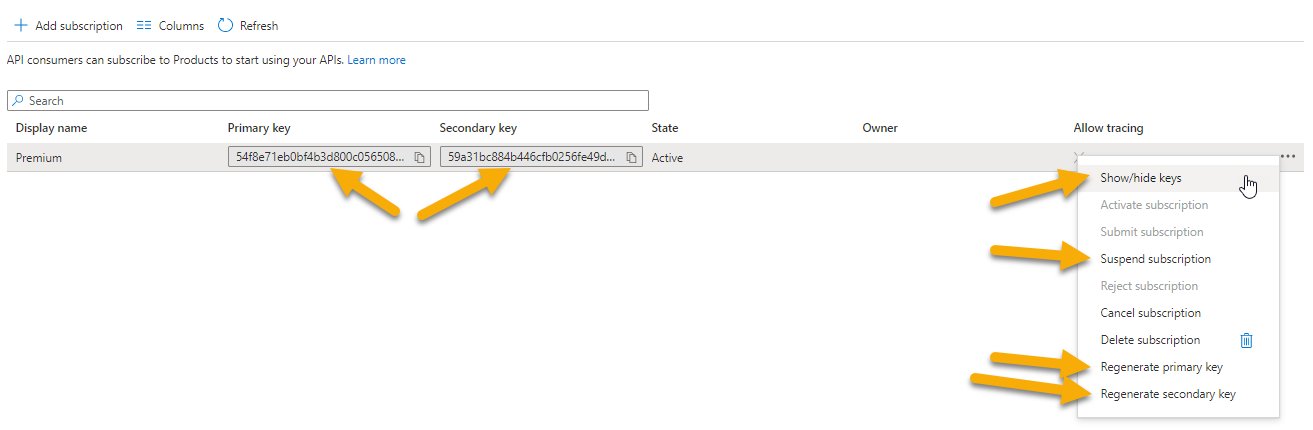
Reviewing subscription keys and options Return to the default level for your entire APIM, then selectSubscriptions. Note that your product subscription is also shown here.
Reviewing all subscriptions Drill into the Unrestricted product and add another subscription, named something likePublicBasicwith DisplayNameBasic, and make sure to drill into the subscription and make a note of the subscription key. - Prove that the functions are still denied execution, and get setup to execute from Postman. Before you setup for authentication, make sure you are calling the functions correctly from Postman so that once the authentication is set you can easily see how powerful this can be. Drill into the AllPublicData API, then open the Test for the Get method as you’ve done before. Scroll down a bit and set the test to use the product level scope, selecting
Unrestricted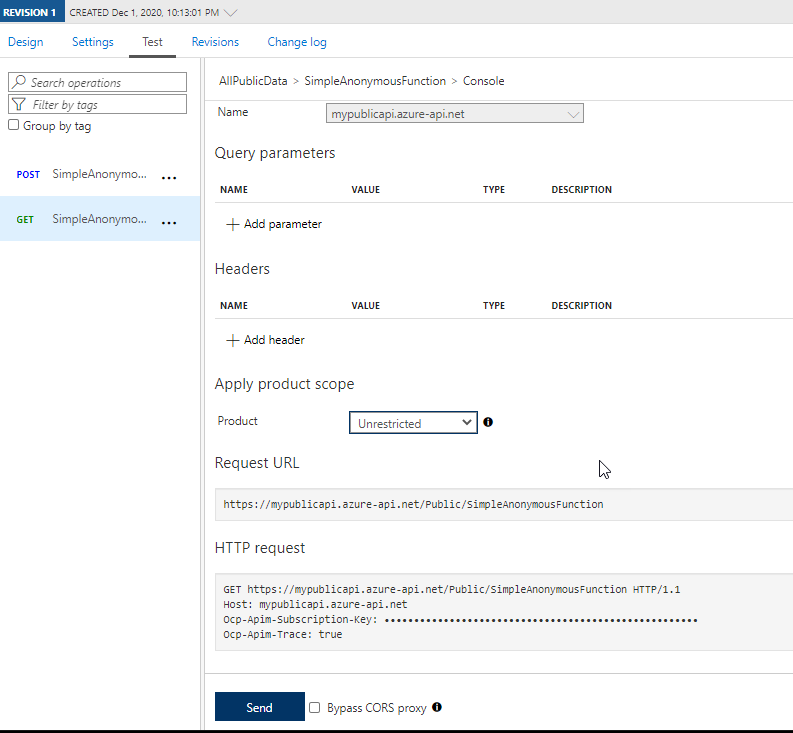
Testing the function again What’s important is to notice the HTTP Request: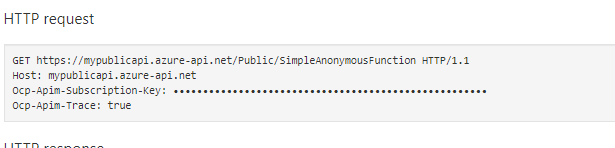
The request contains the URL and the header Ocp-Apim-Subscription-Key In the request, you can see the GET request URL and the header forOcp-Apim-Subscription-Key. This will be critical for your call. In Postman, create a new request. Use theGETURL and save the request asAllPublicData Get SimpleAuthWhich points to the URLhttps://mypublicapi.azure-api.net/Public/SimpleAnonymousFunctionNote: Your API will vary, of course.
And hit the send button. You should a message similar to the following: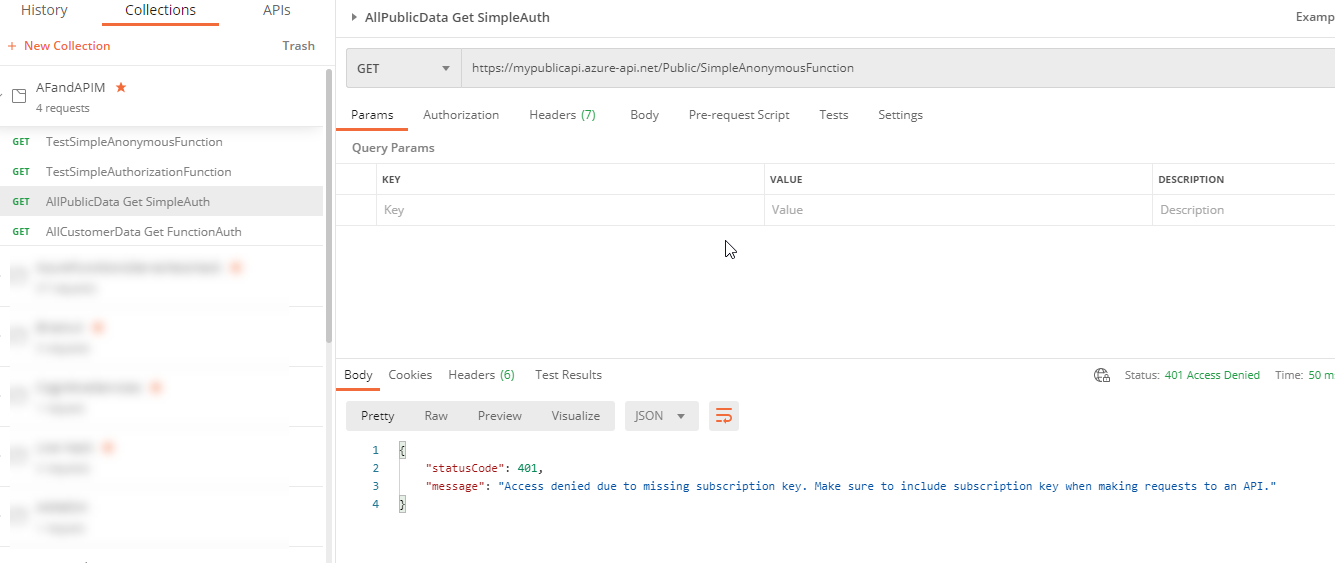
Access is denied due to subscription Add a header to the request for theOcp-Apim-Subscription-KeySet the value to one of the keys from yourBasicsubscription. Then resend the request. The message should change back to a 401 - You do not have permission.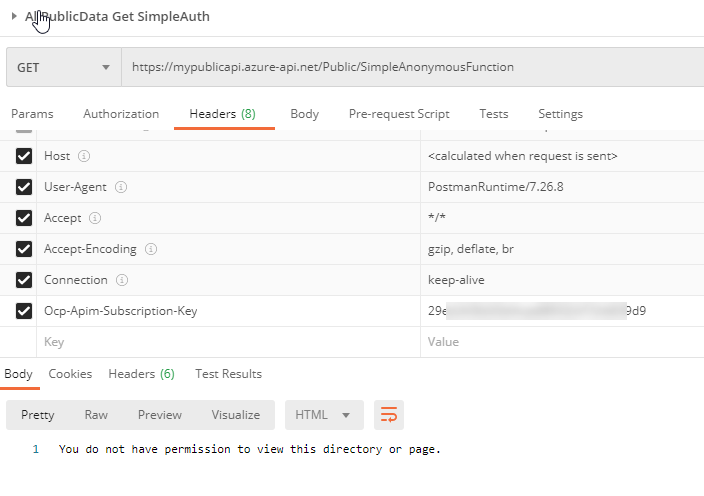
Access Denied Public Data, but subscription is good Repeat this action for another request for the customer data, similar to what is shown in the following image: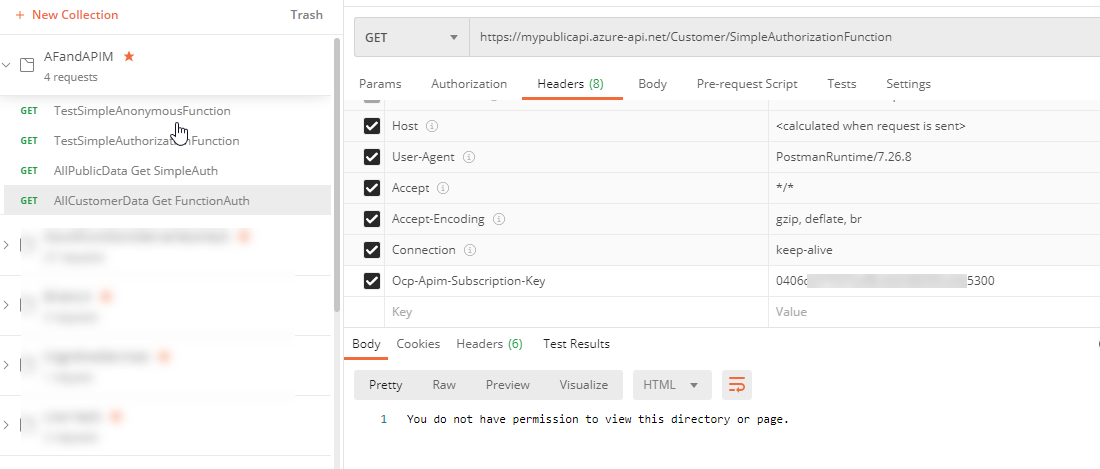
Access Denied Customer Data, but subscription is good
Connect the APIM to your Azure Function App
The main trick to getting this to work is to let your APIM instance work as if it is an authenticated user, so that the APIM can leverage your Azure Functions.
- Ensure the identity for the APIM instance. When you created the APIM instance, you likely gave it a managed identity. I didn’t on purpose to ensure that I needed to do it manually. In the APIM instance in the portal, select the left menu item
Managed Identitieswhich is under theSecurity. Set the status toOnforSystem Assigned(If you already set this, you will already have a system assigned id).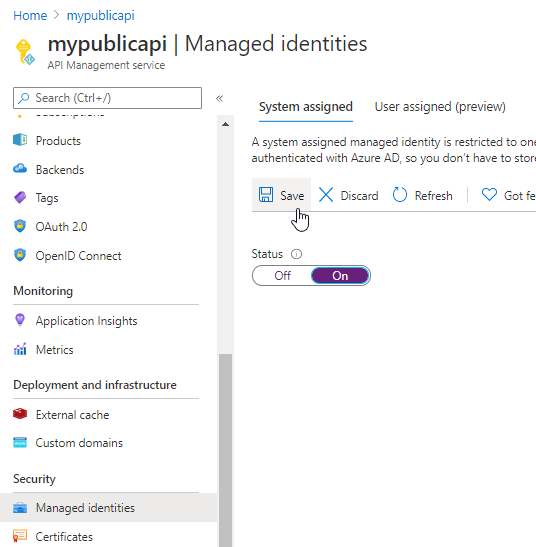
Ensuring a System Assigned Identity HitSave, thenYesto create the id.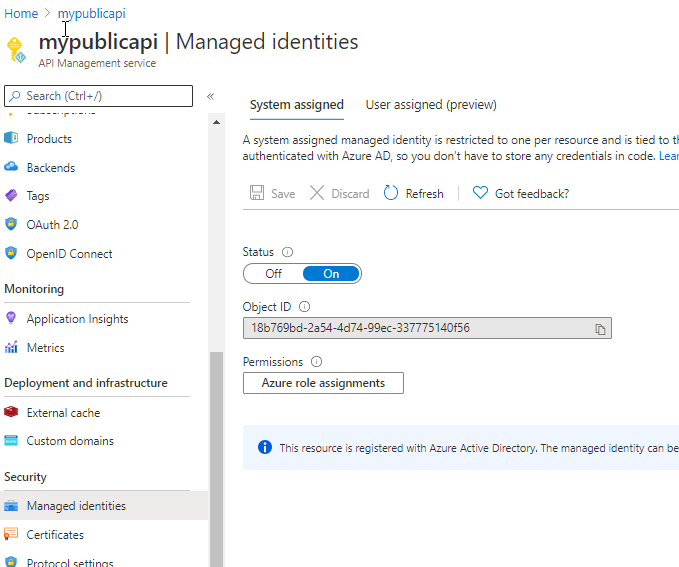
Reviewing the System Assigned Identity The identity is now assigned. - Wire up every call from the APIM to send the function app id for communication. When you created the function app and set it to require authentication, an App Registration was created. Navigate to the
App Registrationsnow.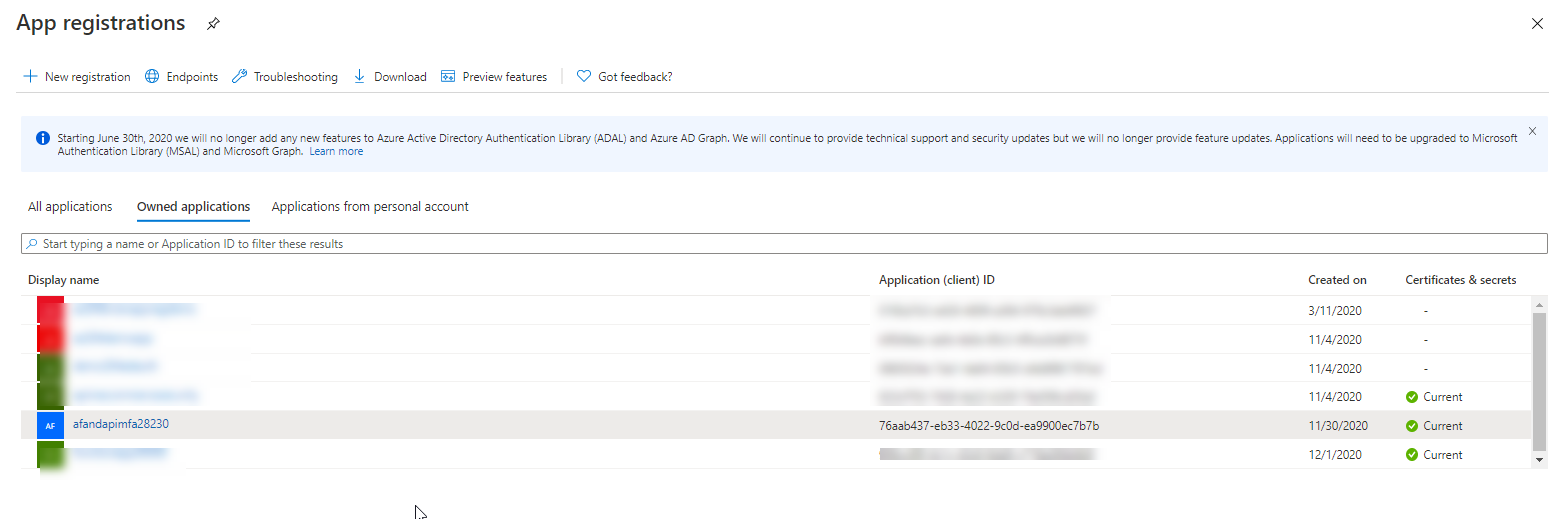
Find your app in the app registrations The ID you need is right there in the grid -> the Application (client) ID. However, if you drill into the app registration, you can easily copy it to your clipboard: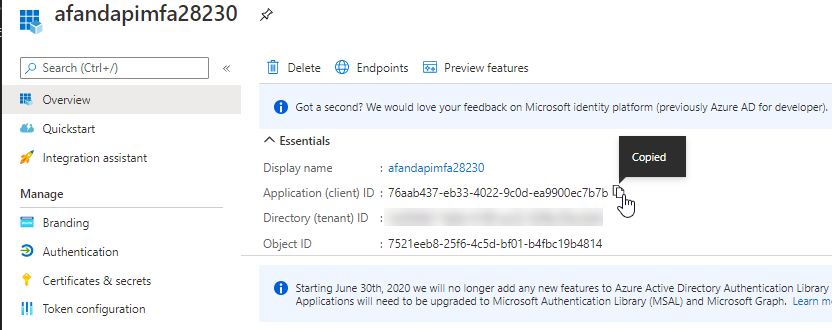
Get your app id Now that you have the application id, Return to the APIM instance to set the connection. - Add a policy to authenticate the APIM against the function app. Go to your APIM instance, then find the APIs and click on
All APIsthen click on thePoliciesto open theAll APIs -> Policieswindow: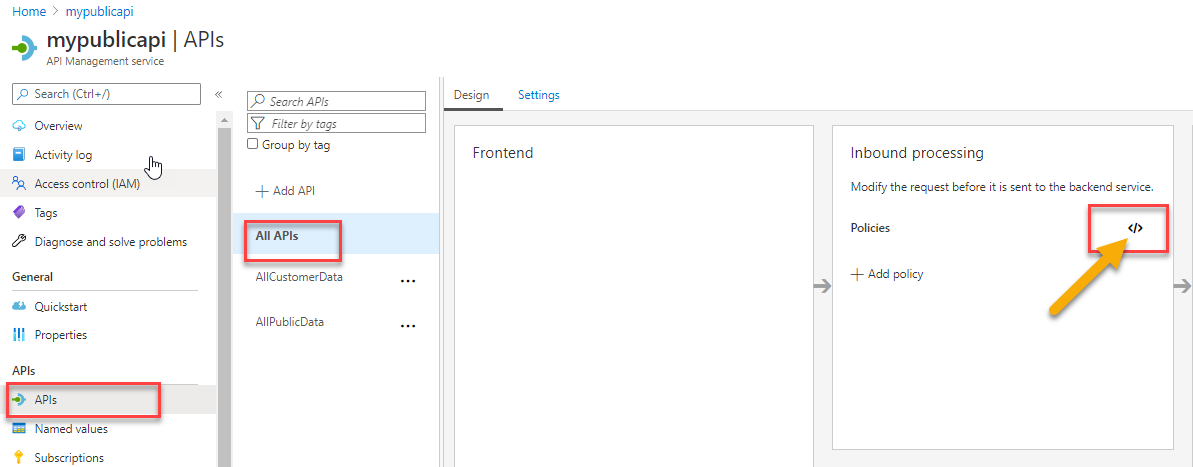
Open the inbound policies for ALL Apis Add the following policy to your<inbound />policies:<authentication-managed-identity resource="your-function-app-client-id-goes-here" />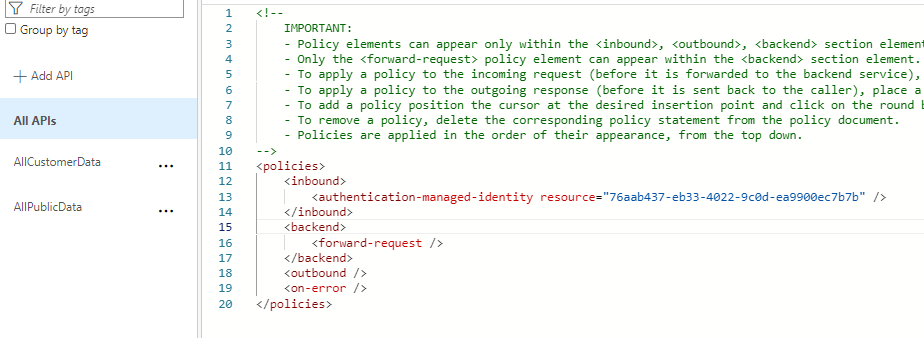
The policy is set Save your changes.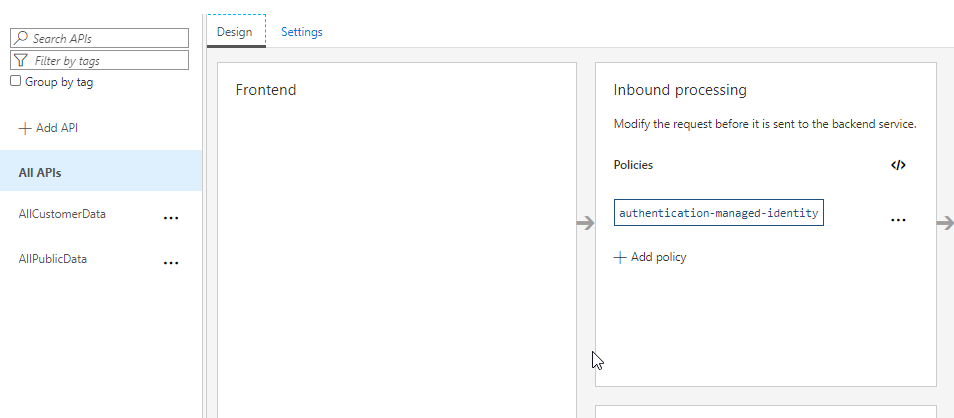
The policy is shown in the inbound processing - Prove the functions can now be called from the APIM. Use the built-in testing to test your APIs.
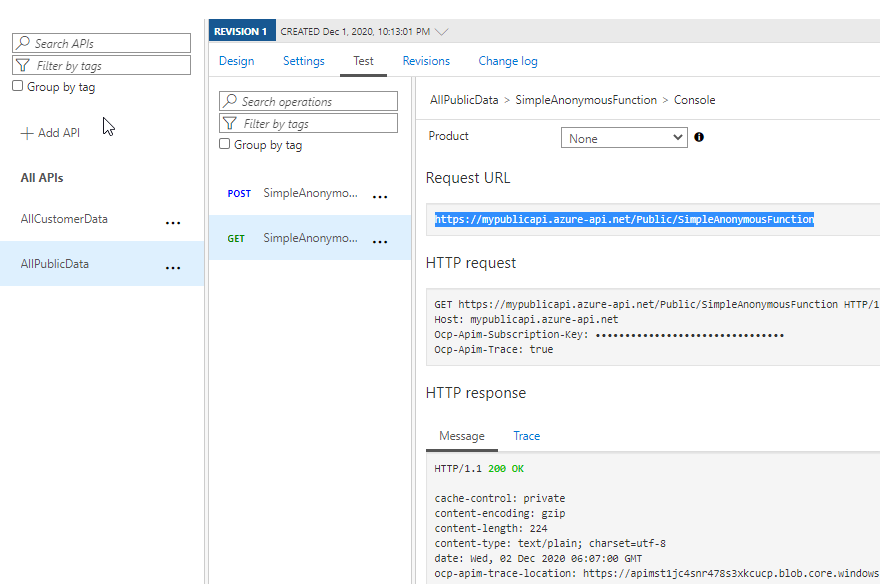
One of the APIs is tested Note that the request is now 200 OK. - Return to Postman and run your requests using the subscription key. The first run will reveal they work, then you just need to add the query parameter for
Nameto get the expected result.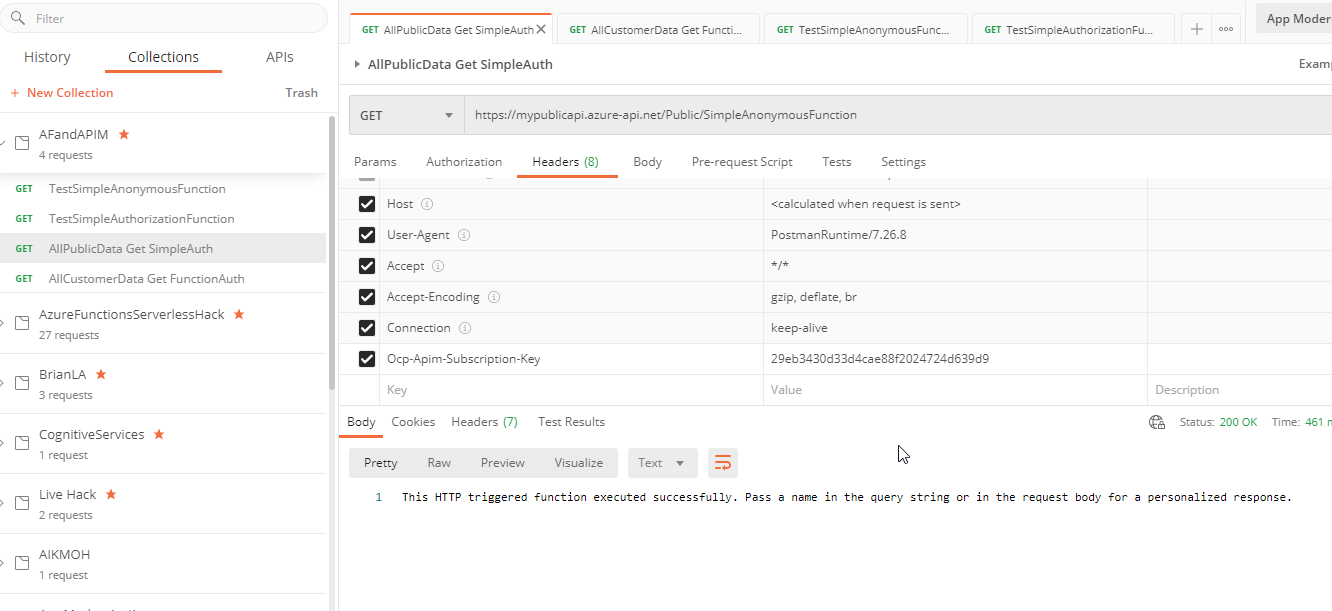
The APIs now work from Postman with the correct subscription and authorization through APIM Add the parameter for the query string and you will get the result you desire from either function, as long as the subscription is good: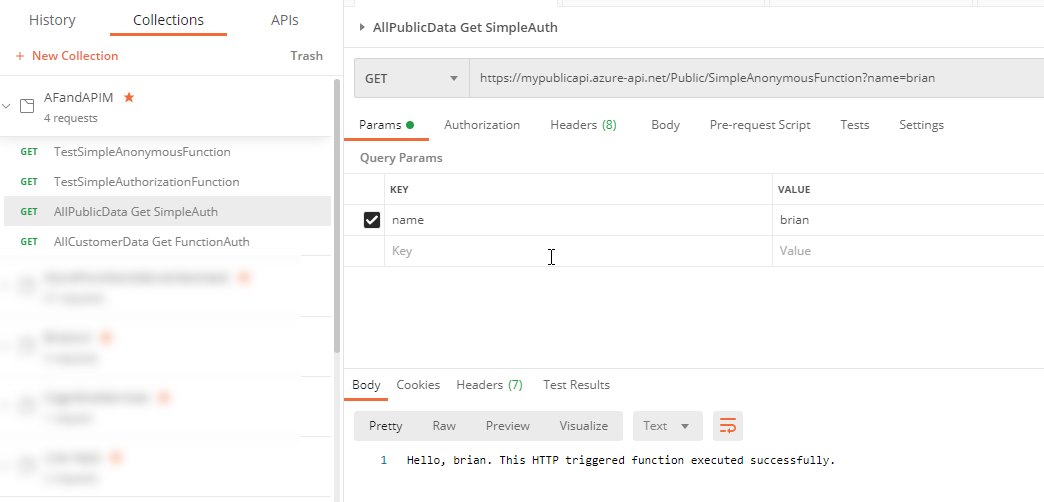
Results are as expected for the public API call Results are now as expected for the public and customer API calls via Postman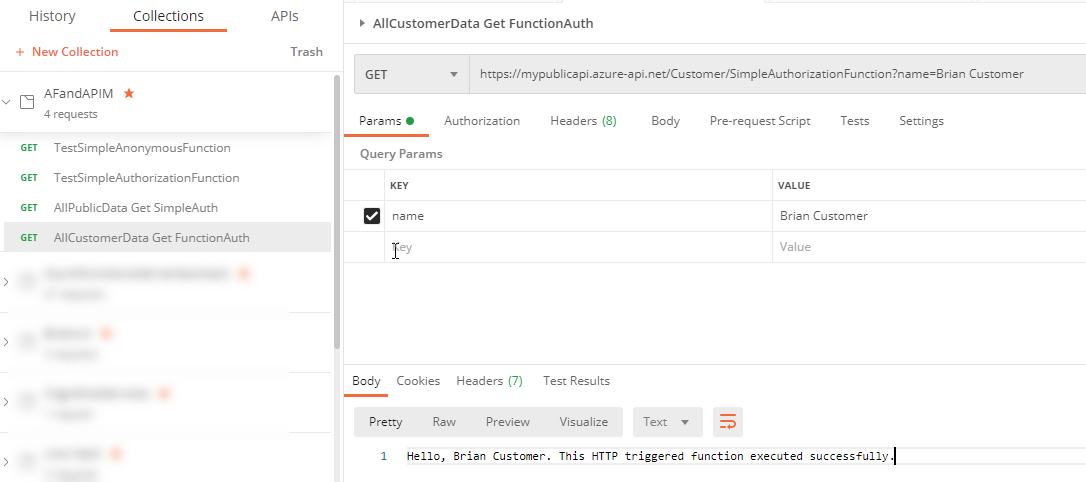
Results are as expected for the customer API call - Ensure that only subscription calls work via APIM. To prove that the calls don’t work without the correct subscription, take any of the APIM URLs and place it in a browser:

Without a subscription, you don’t get data
Conclusion
In this walk-through, you have seen how you can easily create a function app, deploy it to azure, lock down the function app to require authentication, and then use a public-facing facade created by the Azure APIM to allow users to get into the correct functions via subscription keys.
At the end of this walk-through, you have made it so the only gateway into your azure functions (APIs) is via the APIM or an authenticated user. When this is set, direct calls to your functions are blocked unless the user is authenticated. Additionally, you prevented direct calls to your APIM methods by requiring a subscription on each of the APIs. You saw how to easily add products and subscriptions to group your clients, and noted that you can easily rotate these subscription tokens if things go off track.
If you enjoyed this walk through, you should go deeper. At Opsgility, we have a training where you can explore these concepts and more in our Azure App Security challenge, and you can also earn a badge by completing this training. Check out our schedule here, or contact us to find out more about how you can take the Azure App Security challenge or other trainings through Skill Me UP Academy.
Next Steps
Additional concepts you will want to learn to enhance your knowledge include using the APIM to throttle bad players, version your APIs, connect to Azure Key Vault and get secrets, and do other things like make sure that users can’t see what your APIs are doing via the functions.
Resources
Categories: : C#, Azure, Azure Functions, APIM, Managed Identity, Azure AD