Making a List and Checking it Twice
 Brian Gorman

This blog post and video discuss utilization of AuthN and AuthZ for your MVC projects with Azure App Service and Microsoft Identity
README.md
Festive Tech Calendar 2022 - Making a list and checking it twice
In this post, I'll show you how to build an dn7 MVC web application that handles authn and authz, you'll get a quick look at utilizing Azure and GitHub actions, and you'll learn a little about Entity Framework Core and Microsoft Identity.
While that sounds like a lot, I believe we can accomplish everything in about an hour.
I would also like to thank Gregor Suttie and Keith Atherton for hosting this event again this year.
Let's get going!
Find the GitHub Repository here
Initial Discussion: Custom Users in ASP.Net Core with the ASP.Net Identity
I want to start by talking quickly about users within the ASP.Net Identity ecosystem. In almost every scenario, I personally prefer to separate all of my business logic into a separate data context. This makes the data context reusable in other projects, so typically I'll create the default project with the ApplicationDbContext which houses the information for the Users (essentially nothing but the default migration and all the default identity tables). I then create a second context for the business logic and data and layer the project. I personally find this easier to test and utilize, and it also helps me to keep things a bit more organized as I tend to struggle when everything is in one project.
If, however, you want to do customizations on the Identity User, especially if you want a guaranteed ability to relate objects back to the identity user, then you can't use multiple data contexts. It's not possible in Entity Framework Core (or any EF version I'm aware of) to relate objects across contexts.
Later in this project, the identity user will be referenced by Id in order to determine that the TodoListItems are associated to the correct user. With that in mind, only two options exist:
- Create two contexts as I would ordinarily do, and use my own code solutions to manage the identity mapping to a real user in the database
- Complete everything in the same project under one context, so I can directly relate an association to the user for the purpose of direct relational tracking of the user information.
While the second option would be far easier to manage when it comes to the identity user information, it is not necessary to accomplish the tasks I want to do for this demonstration. I do think, however, that managing and overriding user information is important enough to be worthy of another conversation and a video of its own, so I decided to create one, and while it won't be released with the Festive Tech Calendar video, I'll link to it here and briefly mention it in the Festive Tech Calendar official video (and this blog post). To make this interesting, this project is going to be a hybrid approach where the first part is overriding the information and getting ready to utilize the ability to map unique properties for the ASP.Net Identity user. For the relational data later, the User Id will just be leveraged as a string and managed in code. In some ways, this is the best and worst of both worlds. I'll leave it to you to decide how you would like to work with your projects in the future in regards to the architecture and layering and user management.
Additionally, if you are interested in step-by-step instructions showing the way to correctly override the user information that is baked into the ASP.Net Identity ecosystem, then I suggest you review this blog post: "Custom User Management in ASP.NET Core MVC with Identity" by Mukesh Murugan. That resource has everything you need to do things like:
- Create an ApplicationUser object that extends the default IdentityUser object
- Rename the default tables in ASP.Net identity (not necessary, but a cool thing he did there)
- Override the default razor pages in your project for the registration and management of user profile information
- Leverage migrations to build out your custom fields on the identity user.
-
Creating the project.
In order to do the Festive Tech Calendar event, I need to have a default project ready to go, so this video is just me creating the project and doing the following tasks:
- Getting the project built as a .Net 7 MVC with Individual Identity
- Overriding the default User in the project
- Injecting the new User Type into the
Program.csfile - Making sure the
ApplicationDbContextleverages theTodoListUserthrough generics - Updating the Razor Pages to utilize the overridden identity for the project
Note: I'm not doing anything with the overridden user at all, but it is set up and ready to go should you want to take it to the next level.
-
Review the optional video if you are interested.
Step 1: Get the starter Web App
For this demonstration, I'm using a simple MVC application with authorization. As mentioned above, the code is layered with Identity User information in the default state and in its own context. If you wanted to do a similar project, writing this code in other projects would be similar other than establishing injection and other non-trivial changes that happen in non-MVC projects (i.e. not using JQuery but instead leveraging Angular or React to asynchronously post and get from API endpoints).
In the repo, I've tagged the starter project as v1.0 if you would like to start from the ground up. If you want to just leverage the completed web project, just get the final version as it sits in the repository (likely v2.0 release). However, if you do start with the end project (v2.0), you'll have to make sure to still configure everything for identity at Azure. Nothing will work in that case until everything is in place.
-
Project information:
The starter app has the following
- All of the initial setup, including the custom user discussed above with scaffolded UI pages
- The
TodoListModelsproject, with aTodoListItemmodel - The
TodoListDataproject with aTodoListDataContextdbcontext - The
TodoListDataContextinjected into the program
-
Getting started
After getting the project, make sure the database connection makes sense in both appsettings.json files and then run the migrations. Due to the multiple contexts, you'll need to leverage the context by name in your migrations going forward:
update-database -context ApplicationDbContext
update-database -context TodoListDataContext
This should generate all the tables and both contexts can be independent but still leverage the same database as long as you don't make migrations that are named exactly the same.
Step 2: Get the project into GitHub
Once you have the default project and you are sure that everything is working, get the code into GitHub
-
Create a new Repository at GitHub
Create a new repository. Choose public or private.

Since you already have code locally, leave the licensing, gitignore, and readme blank
-
Create a local repository in your directory for the project
In the local folder, type:
git init
dotnet new gitignore
touch README.md
git add .
git commit -m "initial commit"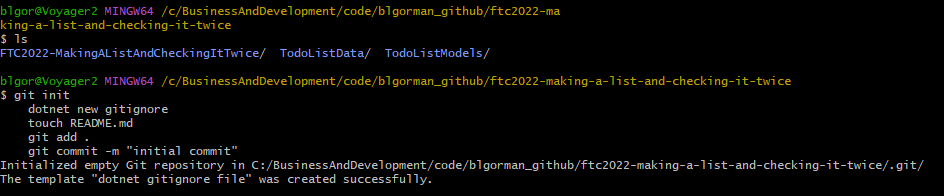
-
Push your code to the repo from your local machine
Find the link to your repo on the recently created repository, then push your local repository:
git remote add origin https://github.com/your-username/your-github-repository-name.git
git branch -M main
git push -u origin main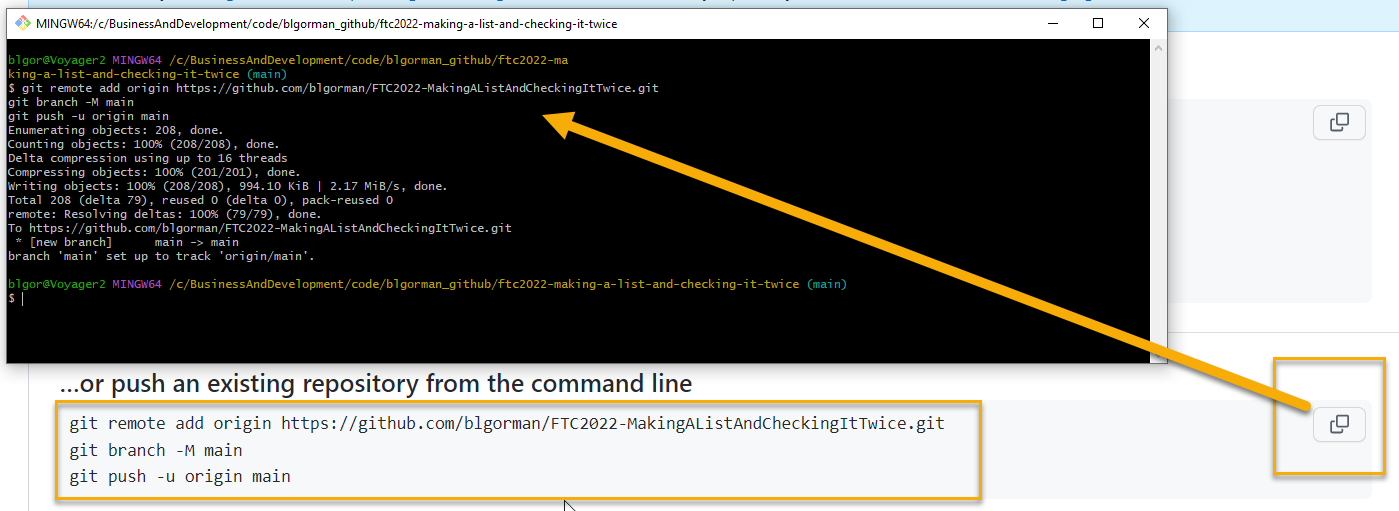
-
Optionally, modify your README.md file to have information about your project
# This is my Todo List Project
Step 3 - Deploy the Azure App Service
In this step, you'll set up the App Service at Azure and implement CI/CD to your GitHub repository
-
Navigate to the Azure Portal, start creating the project
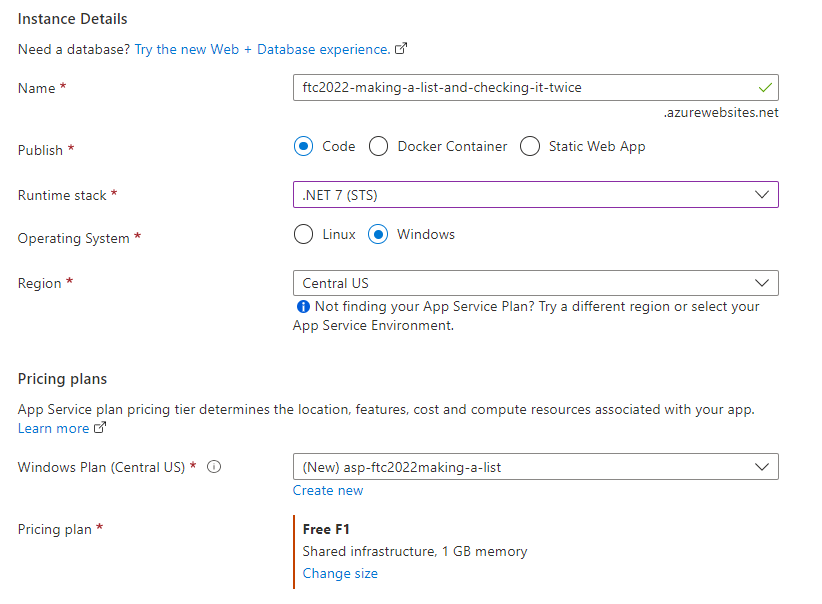
In the portal, create the app service with the following settings:
- Name: Unique FQDN
- Publish: Code
- Runtime Stack: DN 7
- Operating System: Windows
- Region: [choose one close to you]
- Plan: [create new, name it something useful]
- Pricing Plan: Free F1
Hit the Next -> Deployment
-
Enable CI/CD from GitHub
Select
Enableon continuous deployment.Link your GitHub Account (if not already linked)
Select the organization (your github username)
Choose the repository and branch.
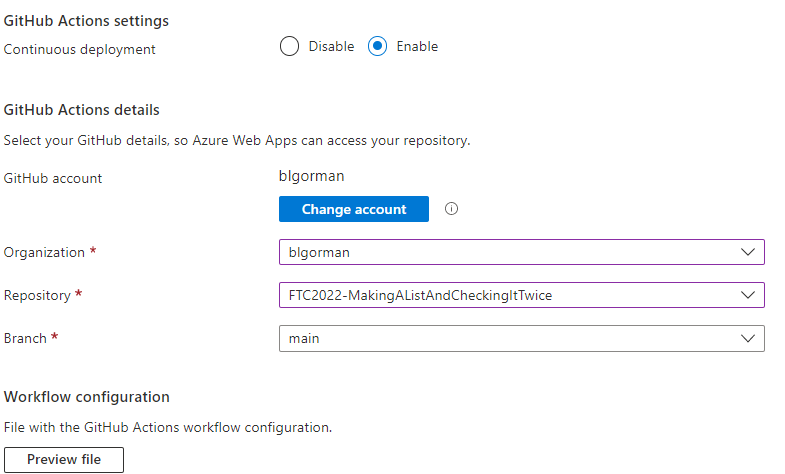
After setting this up, hit
Next : Networking >then hitNext: Monitoring -
Optionally Enable App Insights
If you want robust tracing and monitoring of your application, enable Application Insights. You will need to instrument the application (it's not on by default if you want this).
Even though it's not currently instrumented, for the demo I'm leaving it on, and will likely add it later.
I'm just leaving the defaults generated by the system, then hitting
Review + create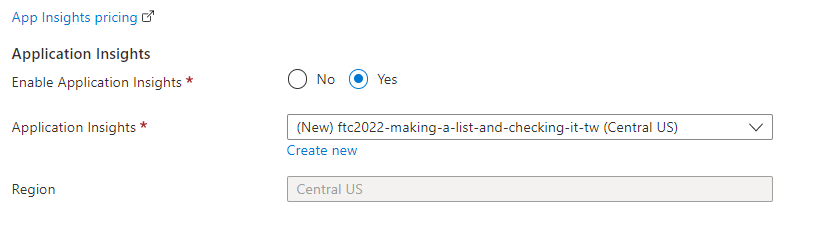
-
Create the app and deploy it
Hit the
Createbutton to create the app and also generate a workflow CI/CD file at GitHub for deployment of the code.Proceed to the next step while the application provisions, builds, and deploys.
Step 4 - Create an Azure SQL Database
In this step, you'll create the SQL database to back the web application for both Identity and the TodoListItems. If you want to create two databases, you can do that and point each context to their own database. That will cost you for two databases, however, so it's about $5 per month per simple db.
On this step, you'll create a database and a server at the same time. You'll need to ensure that the server firewall lets Azure services connect and work against the database and also you will likely want to add your own IP address so you can connect to the database from your own development environment for testing purposes (and in the portal explorer pane you also need to enable your local IP).
-
At the Azure portal, navigate to the Azure SQL Database blade.
At the Azure SQL database blade, select
Create newOn the Create SQL Database, you'll need to select your default subscription and resource group and then name the database something like:
FTC2022TodoWebDbWith the database name in place, hit the
Create newbutton to create a new server: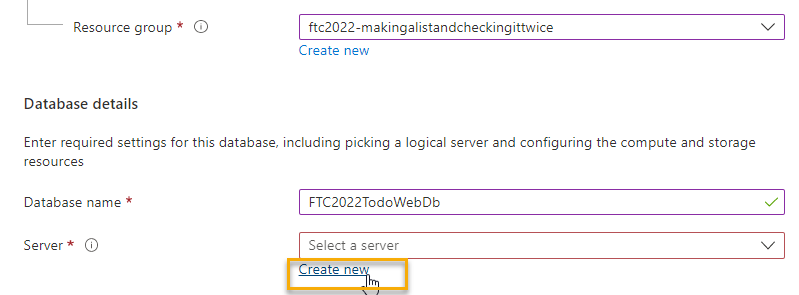
-
Configure the database server
The server must have a unique FQDN and it must be able to use SQL authentication for simplicity (you can optionally use only Azure AD or a mix, but that configuration and setup is not covered in this walkthrough).
Use the following settings:
-
Server Name: any unique FQDN that makes sense
-
Location: Same location as your web app
-
Authentication: Use SQL Authentication
-
Server admin login: simpletodowebdbuser
simpletodowebdbuser -
Password: 1 Special Char, 1 Capital, 1 lower-case, and min length of 8
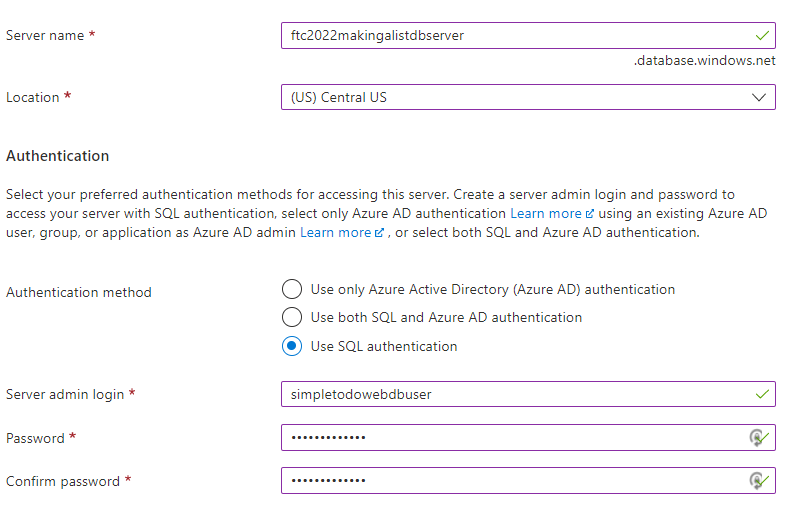
Press the
OKbutton to return to the database creation blade. -
-
Change the pricing for the SQL Database
Note: this is just a sample app, so I'm changing to the least expensive option and using locally-redundant storage only. You shouldn't do this if you intend to use the app for production workloads.
The SQL Database is currently quite expensive. Select the
configure databaselink: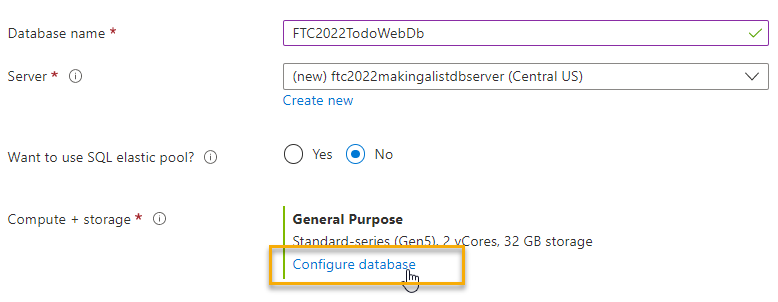
Change the price to the
Basictier with2GBof storage: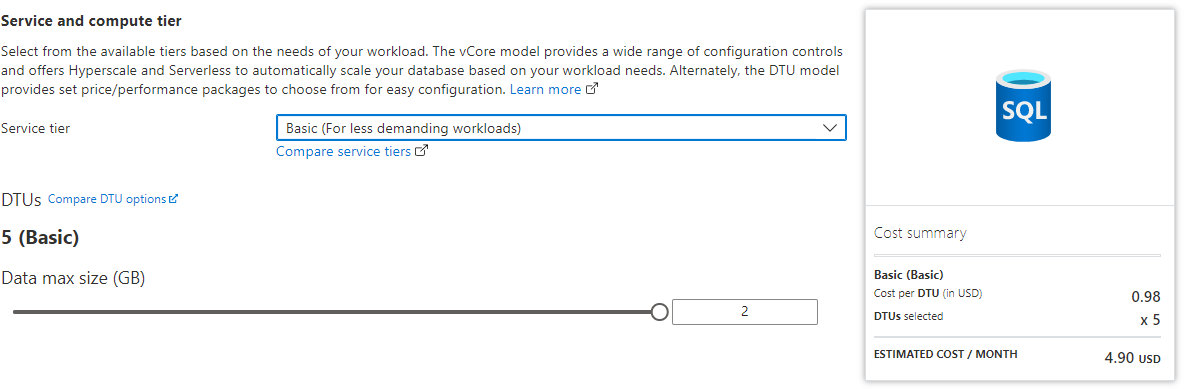
Select
Locally-redundant backup storageto limit the cost of the database storage as you won't need resiliency for this app.Hit the
Next: Networking >button. -
Change Network settings
On the network blade, select
Public endpoint, then enable both sliders for the Azure services and client IP address (set them toYes).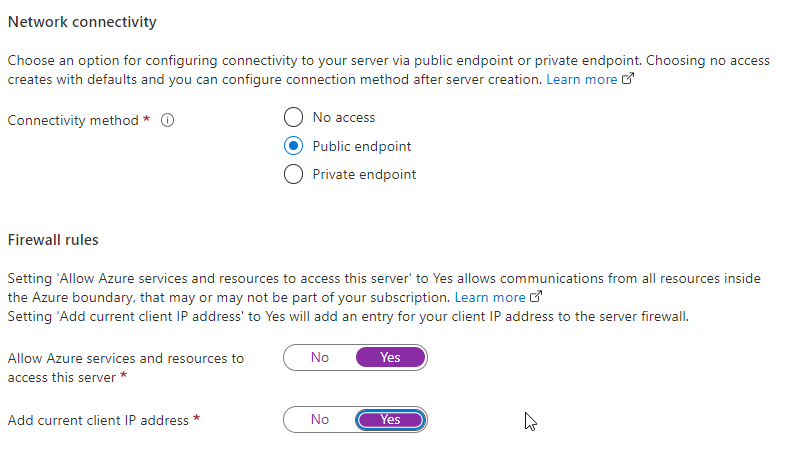
Hit the
Review + Createbutton. -
Review and create.
Validate that your database is of the right pricing range (i. e. ~$5 per month). Also validate that your name and settings and everything look good, then hit
Createto deploy the database.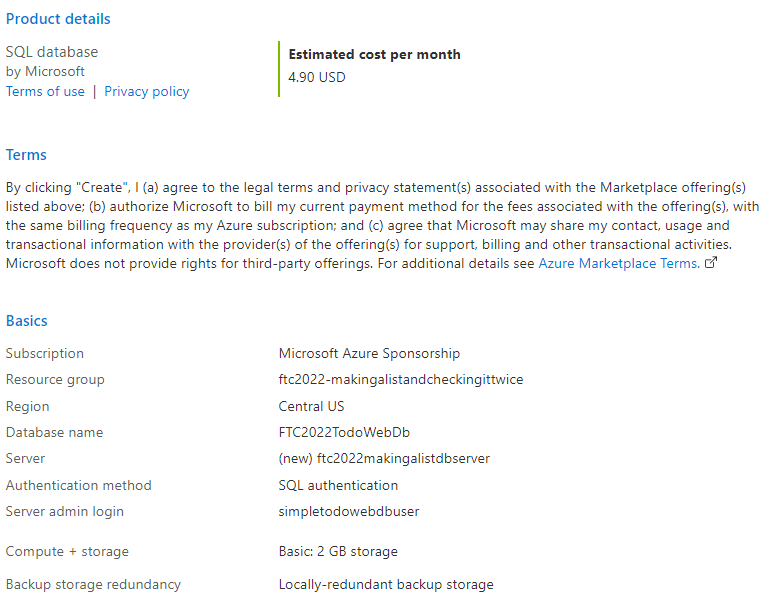
Step 5 - Connect the Application to the database
In the Azure Portal, after the database is deployed, select your database and navigate to the Connection strings blade.
-
Copy the connection string and change a couple of things about it.
Server=tcp:{your-database-server}.database.windows.net,1433;Initial Catalog={your-database-name};Persist Security Info=False;User ID={your-database-user-admin};Password={your_password};MultipleActiveResultSets=True;Encrypt=True;TrustServerCertificate=False;Connection Timeout=30;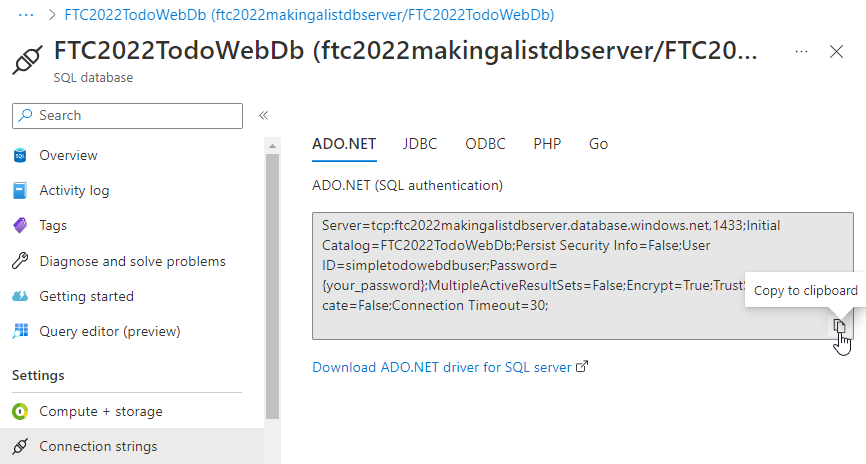
Change the `Multiple Active Result Sets flag to true in the connection string, and replace all the values so your connection string is valid.
-
Once you have the connection string ready, go to your App Service
Navigate to the deployed App Service and select
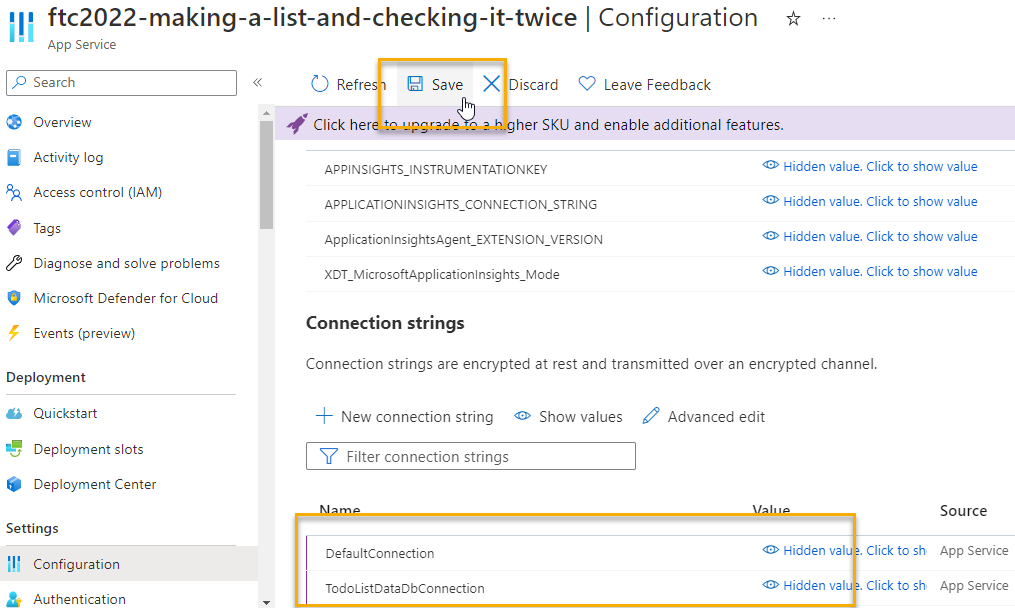
ConfigurationYou'll need to add both connection strings here, even if they point to the saem database. In the test app, there are no slots, so you can ignore the slot setting checkbox. It is critical that you set the Type to
SQLAzure: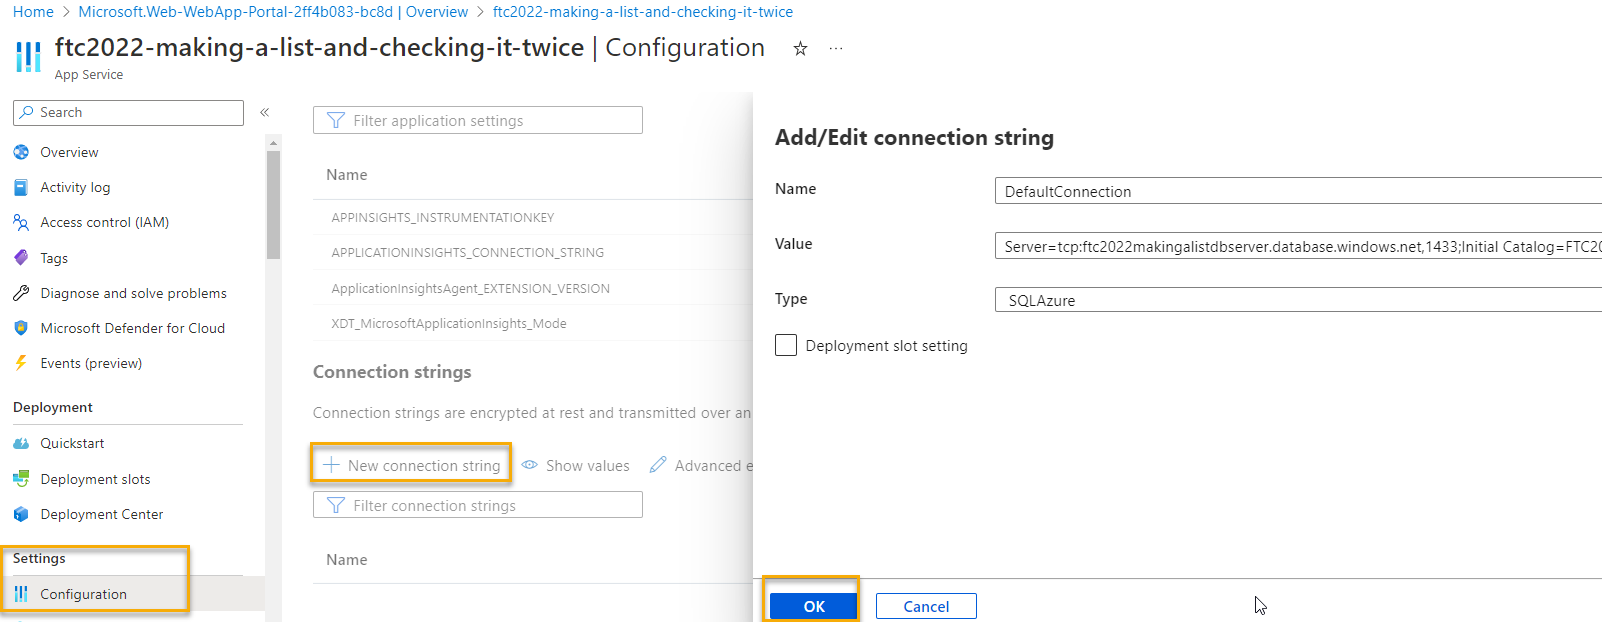
With both connection strings set, save the changes to wire up the database.
-
Run migrations to modify the database at Azure
This step can be accomplished in a number of ways.
- Connect from your local machine and run the migrations from the PMC
- Add code to enable automatic migrations (not production safe)
- Build code to run the migrations on command (i.e. Azure Function or web job).
Although it's not safe, it's easy to deploy with code that forces migrations. This code will prevent you from ever being able to rollback a migration, so use it at your own discretion.
In the
Program.csfile, just prior to thevar app = builder.Build();line, add the following code to the startup method:/***************************************************/ /* Enable automatic migrations (use with caution!) */ var identityContextOptions = new DbContextOptionsBuilder<ApplicationDbContext>() .UseSqlServer(connectionString).Options; using (var context = new ApplicationDbContext(identityContextOptions)) { context.Database.Migrate(); } var todoContextOptions = new DbContextOptionsBuilder<TodoListDataContext>() .UseSqlServer(todoListConnection).Options; using (var context = new TodoListDataContext(todoContextOptions)) { context.Database.Migrate(); } /**************************************************/Run the application locally to ensure it works. With it working, push your changes to the repo for deployment.
Note: You may need to pull & push since your CI/CD yaml file was committed at GitHub.
-
Update workflow
The workflow should be updated to configure a couple of settings:
-
Set the
runs-onagent toubuntu-latest -
Set the Upload Artifact to expire in one day by adding:
retention-days: 1under the
with:section for the Upload artifact.
Checking in the changes will cause the project to rebuild and deploy.
-
-
Review the site at Azure
With the database and migrations in place, and everything wired up, you should be able to register a user at Azure and perform full CRUD on the TODO tasks.
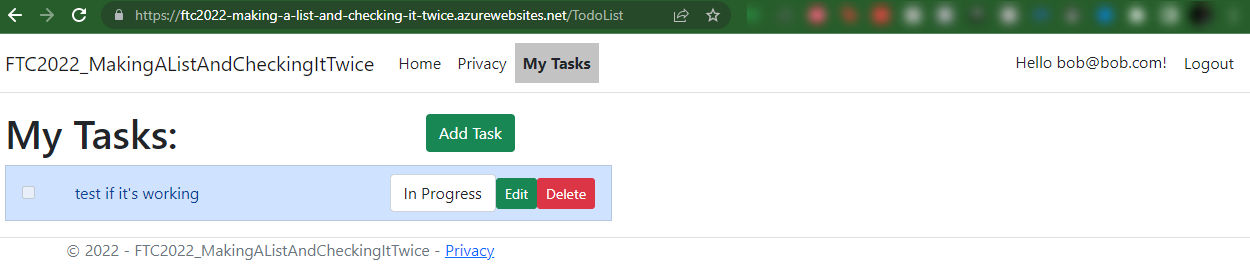
You are finally ready to get to the main part of this project for learning.
Step 6: Examine the problems
Currently, there are a couple of problems with the application when it comes to the TODO list.

-
Any logged in user can see other registered users' Todo List Items
If Bob logs in, Bob can see and edit Tom's list
-
Any user can modify Todo list items
There is no authorization in place, so any user can add a Todo List Item, and they can also see and edit Bob & Tom's stuff.
Step 7: Add Authorization
To remedy the problems identified in Step 6, there are four changes necessary. Make sure only logged-in/registered users see the My Tasks link, make sure only registered users can do anything against the tasks on the controller side, lock down the admin to users in an Administration role, and track the UserId on all tasks so that they are linked back to the owner
-
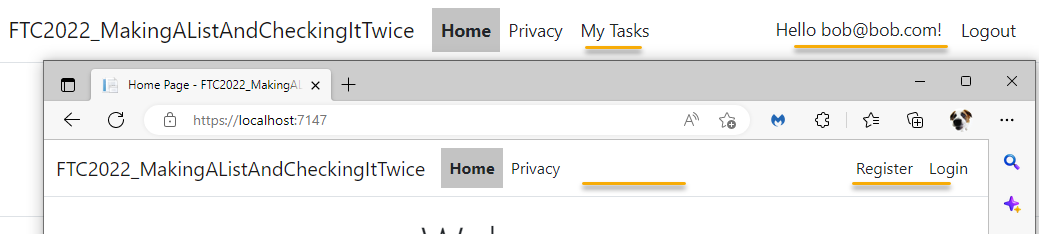
Add authorization on the My Tasks link
To make it so only logged in users can see the
My Taskslink, navigate to the shared layout and modify the layout with the following changes (just replace the currentMy Taskslink with the following):@if (User?.Identity?.Name?.ToString().Length > 0) { <li class="nav-item"> <a class="nav-link text-dark @(ViewContext?.RouteData?.Values["Controller"]?.ToString() == "TodoList" ? "active-link" : "")" asp-area="" asp-controller="TodoList" asp-action="Index">My Tasks</a> </li> @if (User?.IsInRole("Admin") ?? false) { <li class="nav-item"> <a class="nav-link text-dark @(ViewContext?.RouteData?.Values["Controller"]?.ToString() == "TodoList" ? "active-link" : "")" asp-area="" asp-controller="TodoList" asp-action="AdminIndex">Administer</a> </li> } }Note: An additional link is added for an administrator role to be used later.
Run the application and validate that the link only shows when a user is logged in:
-
Add authorization on the Controller
Even though the link is not shown, anyone can still get to the my tasks link if they know it exists.

On the
TodoListControlleradd the[Authorized]Data Annotation to the controller so that ALL methods will require an authorized user.
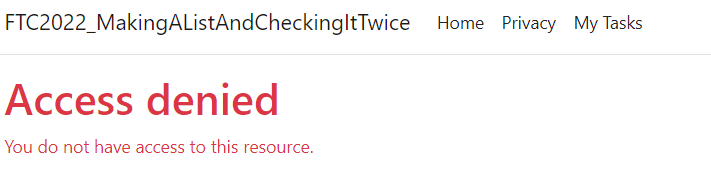
Test the application, now you can make sure that only the logged in users can hit the link. Even if an unauthorized user hits the link, they will be asked to log in.
-
Prevent anyone from seeing the default Administration methods generated by the scaffolding.
In addition to preventing the unauthorized users from seeing and working against the TodoList data, you also need to prevent registered users that aren't admins from being able to do the methods generated by the scaffolding.
To do this, add the following attribute to all of the scaffolded methods for AdminIndex, Create, Edit, and Delete. Do not block the Delete post, however, as that is being leveraged by the app for deleting a TodoList Item.
[Authorize(Roles ="Admin")]Test the application. A logged-in user will be denied access if they try to navigate to one of the administration pages generated by the scaffolding process.
-
Track the User ID associated as the owner of every task.
Finally, now that the authorization is in place, you can lock the todo items down to a specific user. To do this, you'll need to make some pretty substantial changes.
- Add a new field to the TodoListItem class
- Affect a migration
- Make sure that users only see TodoList Items that they own
- Make sure that the UserID is set when creating a new TodoList Item
Add a new field to track the User ID
Start the step by adding the field.
-
Add the UserId.
In the TodoListItem class in the TodoListModels project, create a field to track the user id:
[StringLength(450)]
public string UserId { get; set; }
Save the changes and build the project
-
Create the migration
Utilize the PMC to run the command:
add-migration create-userid-field-todolistitem -context TodoListDataContext -
Update the database
You won't need to run this if you have the Program.cs set for automatic migrations. If you do not have that set, then run this command. If you are unsure, just run the command as it won't hurt anything if it's already applied.
update-database -context TodoListDataContextTest the project. You won't be able to create a new todo list item or edit an existing one because the user id will be unset.
You should still be able to delete items.
Retrieve only Todo List Items associated to the logged-in user
The logged in user information is stored in a local session. You can leverage this to quickly make sure that the user only sees the Todo List Items associated to their user id. They don't have to know anything about this.
-
Leverage the user id of the logged-in user to only show items that they own.
Replace the body of the Index method in the controller with the following code:
public async Task<IActionResult> Index()
{
    var userId = await GetCurrentUserId();
    var items = await _context.ToDoItems.Where(x => x.UserId == userId).ToListAsync();
    return items != null ?
                View(items) :
                View(new List<TodoListItem>());
}
Note: This method is utilizing a helper method in the code that will allow the system to get the logged-in user.
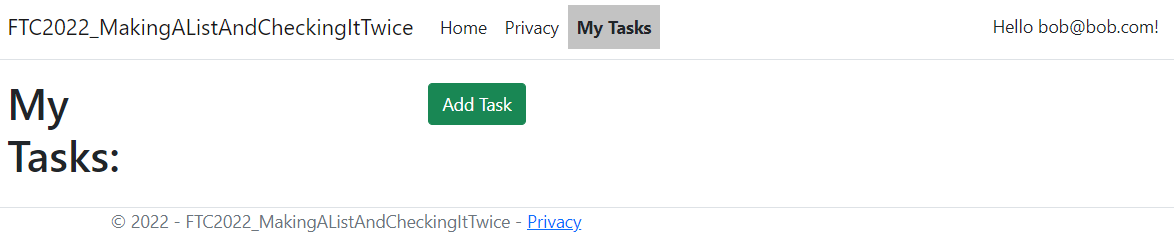
protected async Task<string> GetCurrentUserId()
{
    var userId = User.FindFirstValue(ClaimTypes.NameIdentifier);
    return userId;
}
Make sure that both methods are set and run the project. The logged-in user should now see no items as none have been associated to them.
Update methods for create and edit to leverage the user id
With the listing in place, all that remains is leveraging the user id for the item creation and edit operations.
-
Change the code in the
UpdateTodoListItemStatusTo make this work, you'll want to make sure to fetch only matching by user id:
var item = await _context.ToDoItems.SingleOrDefaultAsync(x => x.Id == todoId);becomes:
var userId = await GetCurrentUserId(); var item = await _context.ToDoItems.SingleOrDefaultAsync(x => x.Id == todoId && x.UserId == userId); -
Make a similar change in the
UpdateTodoListItemmethodChange the following code:
var item = await _context.ToDoItems.SingleOrDefaultAsync(x => x.Id == todoId);to
var userId = await GetCurrentUserId(); var item = await _context.ToDoItems.SingleOrDefaultAsync(x => x.Id == todoId && x.UserId == userId);Note: consider making a helper method for this code.
-
Modify the
AddTodoListItemmethod to inject the user id:Add the following code after the creation of the new TodoListItem:
item.UserId = await GetCurrentUserId(); -
Test the application
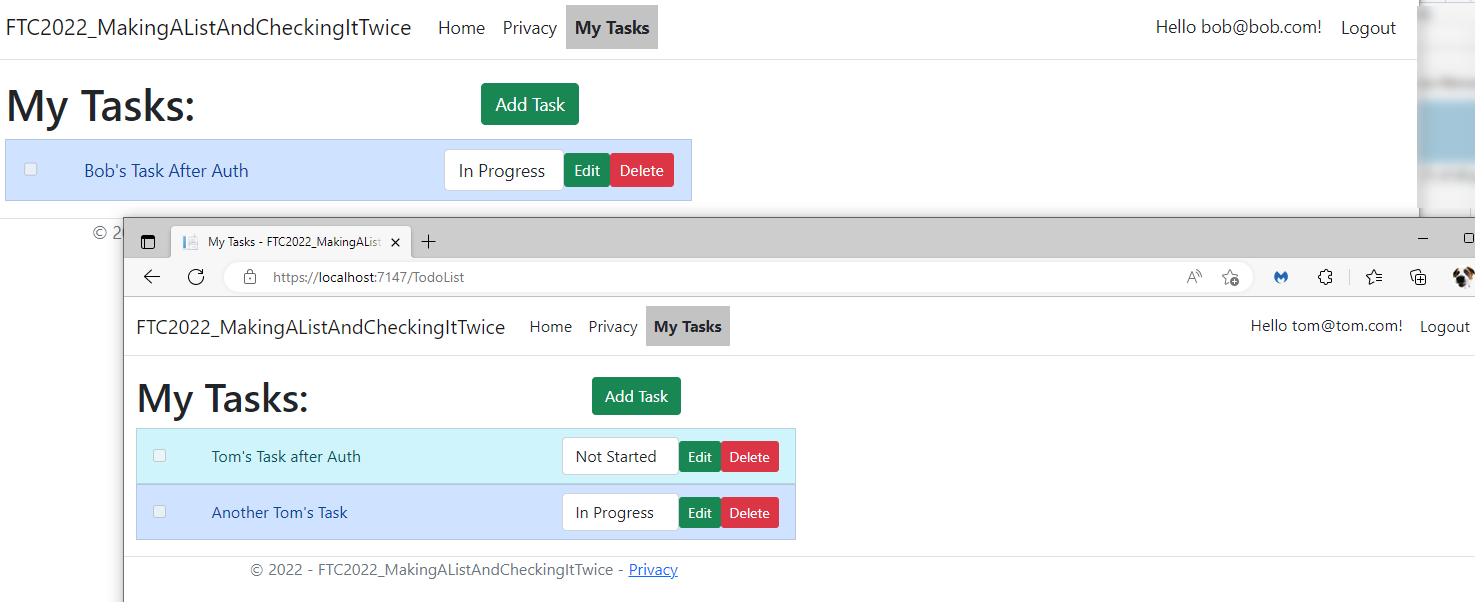
With this code in place, you should now be able to utilize different users and see the different resulting task lists based on the logged-in user.
Step 8: Implement Microsoft Identity as a way to log in
In this task, you'll see how to utilize Microsoft Identity so that the application will be able to be utilized by users in your tenant via Microsoft Identity.
-
To get started, you'll first need to create an app registration at Azure
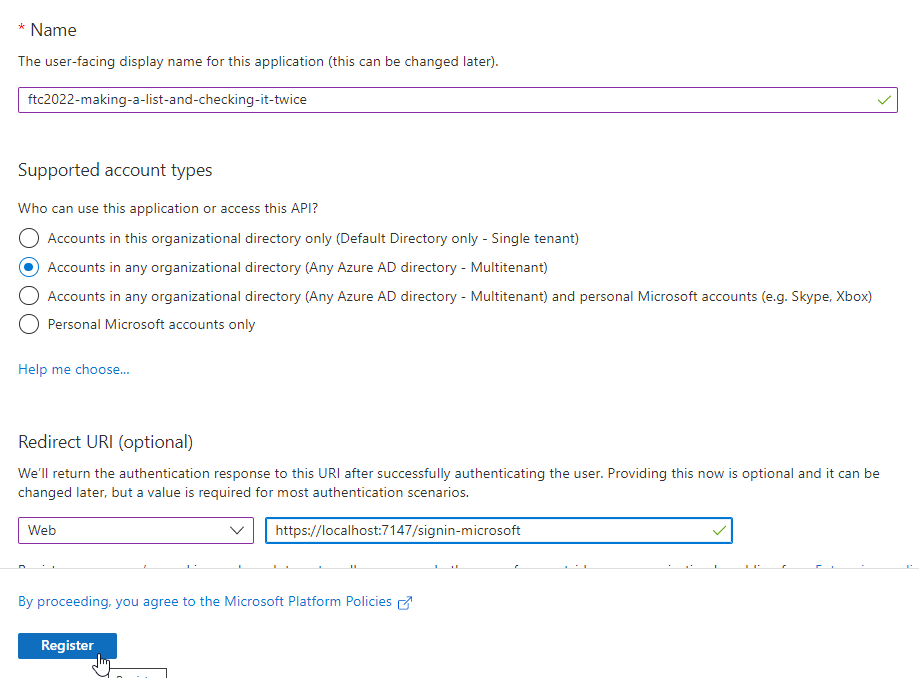
Navigate to the portal and add an App Registration:
- Name: Something that makes sense
- Supported Account Types: Choose either of the Multi-tenant options. The single tenant doesn't work without additional configuration and the Personal accounts only is not a good choice per Microsoft recommendations.
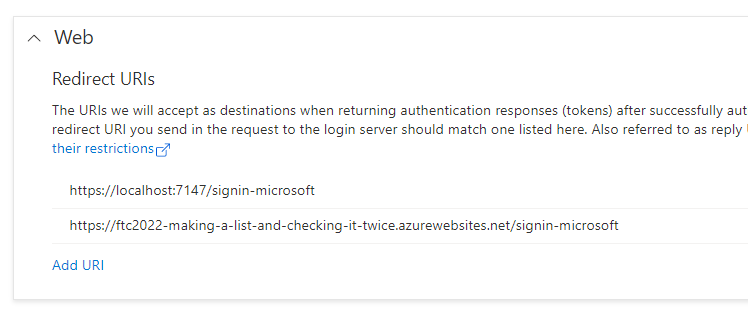
For the redirect URI, you will need one for every offering (localhost and web). The first to create is your localhost with the port followed by
signin-microsoft. Select the web platform and add it:- Redirect URI:
https://localhost:port/signin-microsoft
- Immediately drill in to the
1 weblink underRedirect URIsand add the public-facing link for your deployed app at azure followed by the samesignin-microsoftsuffix:
-
Add a client secret for the handshake
In the normal flow for login using an authorized provider, be it Facebook, Google, or Microsoft, you register an app and get an app id and a token. This information is used to allow authentication to work for your application.
To do this at Microsoft, generate a new app secret.
In the portal under the app registration, select
Certificates and Secretsthen add a newclient secret.- Description: ftc2022-webauth
- Expires: your-desired expiration length 3-24 months or custom (default 6 months)
Gather the
Secret Value. Also, this is the only time you'll see the value so make sure you put it somewhere safe. The other information is extraneous. You will also need the Application ID that is created as part of the app registration. Use that value in the Client ID, and the secret value as the Client Secret.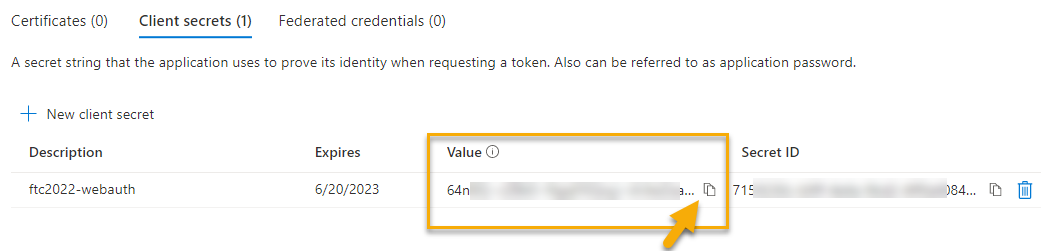
-
Add the secret information in your developer secrets for the web app
In the local web application, manage the user secrets. Add the values for the Secret ID and the Secret Value to the config file:
{
    "Authorization:Microsoft:ClientID": "your-application-client-id-guid-here",
    "Authorization:Microsoft:ClientSecret": "your-client-secret-value-here"
}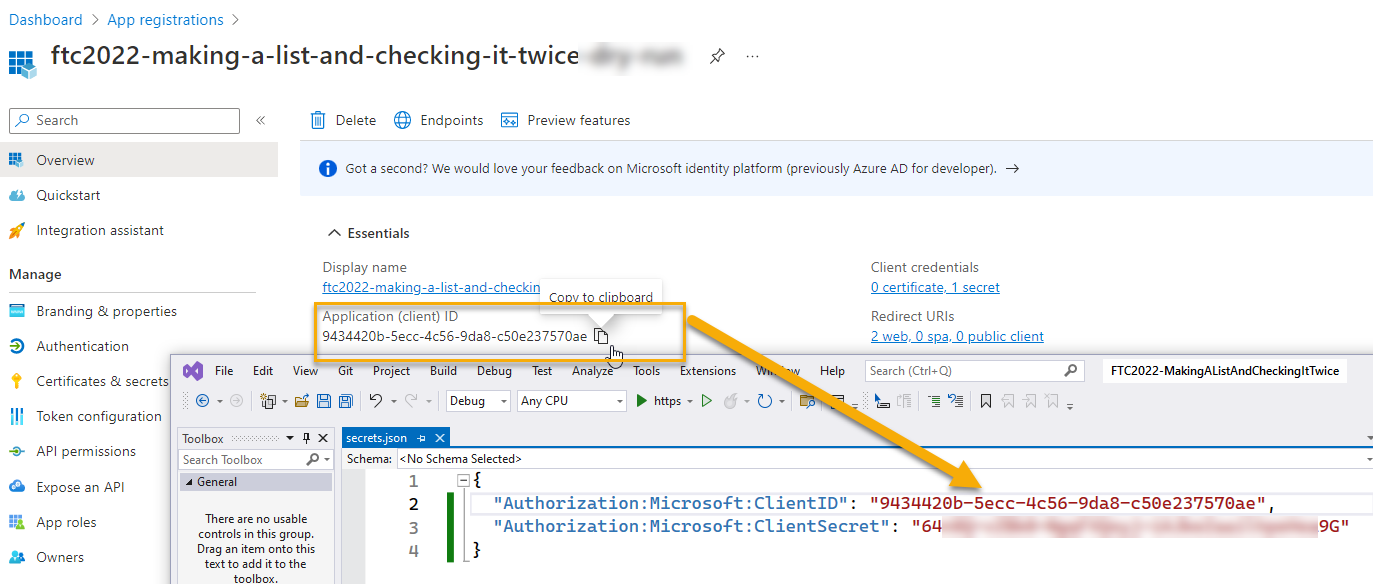
-
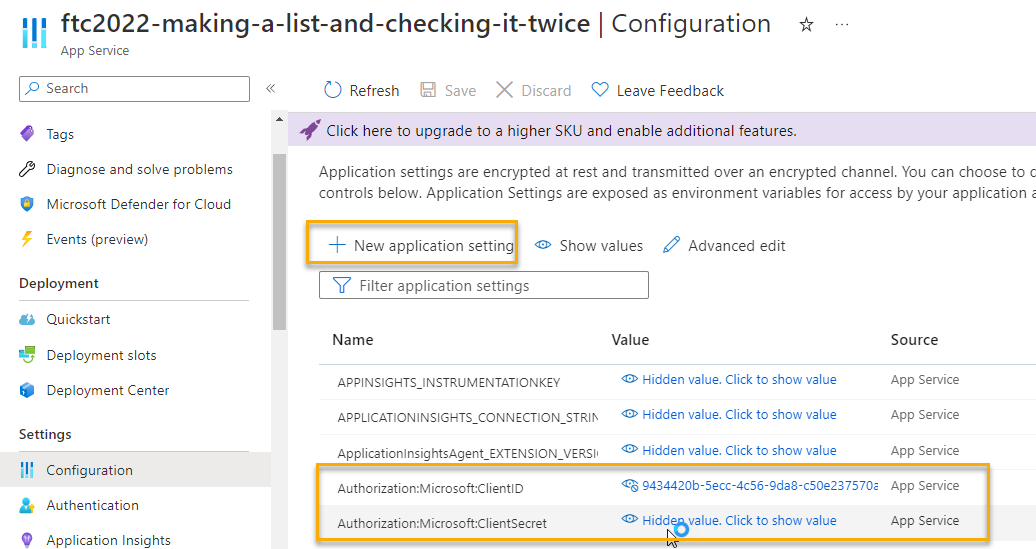
Add the secret information to the App Service
Navigate to the app service and add the secret information into the configuration there as well:
-
Update the web app to leverage the Microsoft Identity Login
To complete the puzzle, the
Program.csfile needs to be modified to allow login via Microsoft.In the
Program.csfile add the following code before setting the default Identity:builder.Services.AddAuthentication().AddMicrosoftAccount(options => { options.ClientId = builder.Configuration["Authorization:Microsoft:ClientID"]; options.ClientSecret = builder.Configuration["Authorization:Microsoft:ClientSecret"]; });You'll also need to get a NuGet package. Use the NuGet package manager to browse for
Microsoft.AspNetCore.Authentication.MicrosoftAccountand add it to your project: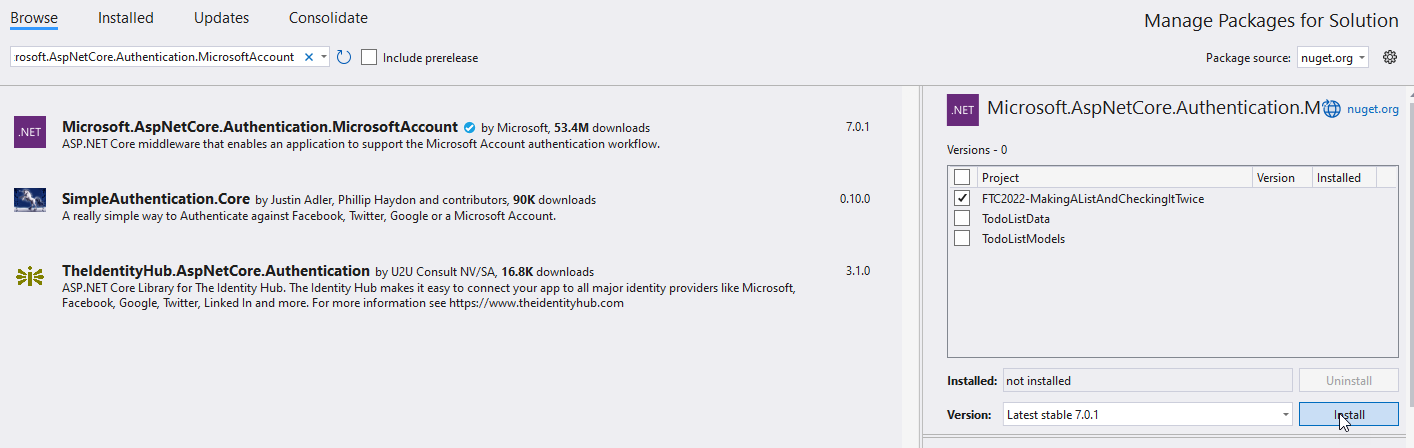
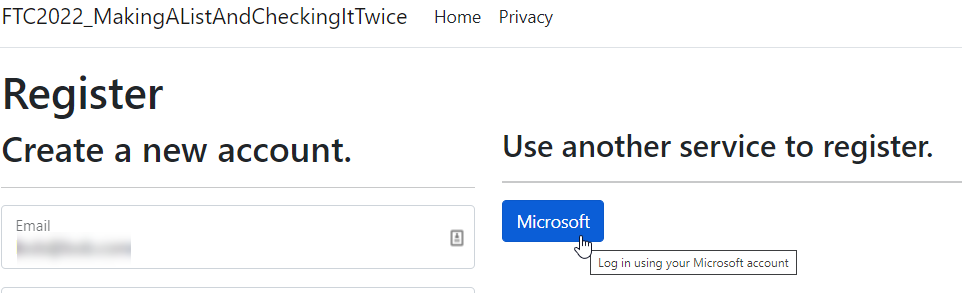
This should clear any errors. Test the system, and register as a user with your User Account:
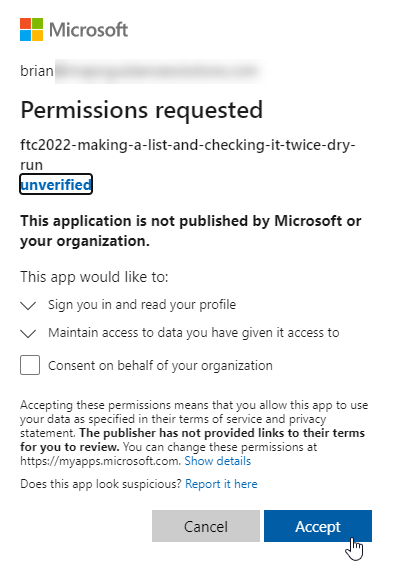
With this in place, you get prompted to give permission:
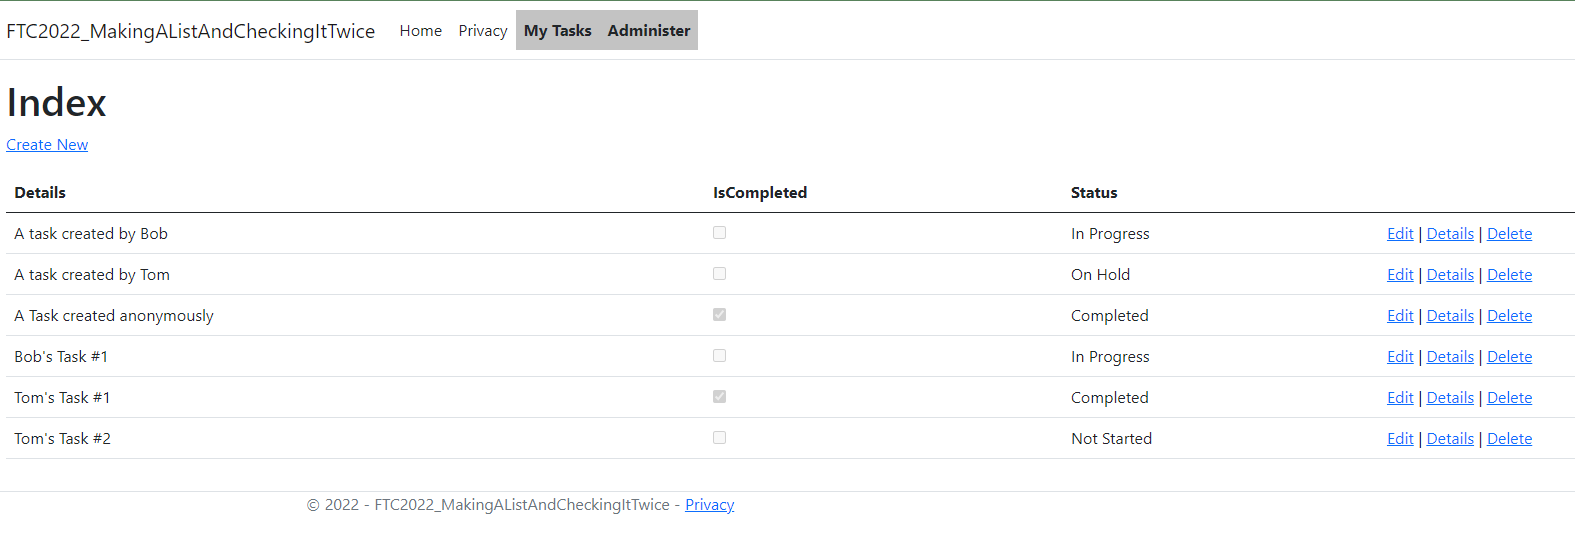
Once that is done, you can now log in with Microsoft and you don't have to enter a password any more. Also, you get access to your own tasks:

Step 9: Implement a Super Admin user in the Admin Role
To give your super admin super powers, create a service to modify the roles and inject your super-admin user into the role. Make the method idempotent and hidden so that it's not harmful to run it and not really known to lay users.
-
Add a service interface in the Data project folder
Start by adding an interface named
IUserRoleServicewith one methodTask EnsureUsersAndRoles()in the Data Folder:public interface IUsersRolesService { Task EnsureUsersAndRoles(); } -
Create an implementation of the service.
Add a class named
UserRoleServicethat implements the following code:public class UsersRolesService : IUsersRolesService { public const string ADMIN_ROLE_NAME = "Admin"; private const string ADMIN_USER_EMAIL = "mccoy@ncc1701.com"; private const string ADMIN_USER_PWD = "izDrNotC0d3R!"; private readonly UserManager<TodoListUser> _userManager; private readonly RoleManager<IdentityRole> _roleManager; public UsersRolesService(UserManager<TodoListUser> userManager , RoleManager<IdentityRole> roleManager) { _userManager = userManager; _roleManager = roleManager; } private async Task EnsureRoles() { var existingRole = await _roleManager.FindByNameAsync(ADMIN_ROLE_NAME); if (existingRole is null) { var adminRole = new IdentityRole() { Name = ADMIN_ROLE_NAME, NormalizedName = ADMIN_ROLE_NAME.ToUpper() }; await _roleManager.CreateAsync(adminRole); } } private async Task EnsureUsers() { var existingAdminUser = await _userManager.FindByEmailAsync(ADMIN_USER_EMAIL); if (existingAdminUser is null) { var adminUser = new TodoListUser() { Email = ADMIN_USER_EMAIL, EmailConfirmed = true, UserName = ADMIN_USER_EMAIL, NormalizedEmail = ADMIN_USER_EMAIL.ToUpper(), NormalizedUserName = ADMIN_USER_EMAIL.ToUpper(), LockoutEnabled = false }; await _userManager.CreateAsync(adminUser, ADMIN_USER_PWD); } } public async Task EnsureUsersAndRoles() { //ensure roles await EnsureRoles(); //ensure users await EnsureUsers(); var existingAdminUser = await _userManager.FindByEmailAsync(ADMIN_USER_EMAIL); var existingRole = await _roleManager.FindByNameAsync(ADMIN_ROLE_NAME); if (existingAdminUser is null || existingRole is null) { throw new InvalidOperationException("Cannot add null user/role combination"); } var userRoles = await _userManager.GetRolesAsync(existingAdminUser); var existingUserAdminRole = userRoles.SingleOrDefault(x => x.Equals(ADMIN_ROLE_NAME)); if (existingUserAdminRole is null) { await _userManager.AddToRoleAsync(existingAdminUser, ADMIN_ROLE_NAME); } } } -
Inject the services into the
Program.csfileTo utilize the service, inject it. In the
Program.csfile, before thevar app = builder.Build(), add the following code:builder.Services.AddScoped<IUsersRolesService, UsersRolesService>(); -
Add a secret method in the HomeController
To make sure the roles exist, you could do a number of things. This is a hack but for demonstration purposes, just add an injection of the service into the Home Controller:
private readonly ILogger<HomeController> _logger;
private readonly IUsersRolesService _usersRolesService;

public HomeController(ILogger<HomeController> logger, IUsersRolesService usersRolesService)
{
    _logger = logger;
    _usersRolesService = usersRolesService;
}
With this in place, create a new secret method:
public async Task<IActionResult> EnsureUsersAndRoles() { await _usersRolesService.EnsureUsersAndRoles(); return RedirectToAction("Index"); } -
Run the application to test it
Validate that you can now log in with the super user and see the additional abilities of a super user.
Note: the CRUD won't work without additional work to bind/hydrate the UserId, but the guts are in place to do this now.
Conclusion
In this video/demonstration you saw how to get up and running with MVC and build a system that utilizes authentication and authorization to make sure only the correct people are seeing their todo list items. You also saw how to integrate authentication from the Microsoft Identity Platform into your web application.
From here, you could add additional 3rd party providers, or you could make it so only authenticated users from your tenant can utilize the site.
Let me know what you think of this post. Drop a comment or send me a message at Twitter or Linked-In. Also, keep an eye out for my upcoming AZ-204 Exam Ref book from Apress where I'll cover this in more detail as well as many other important topics in relation to the AZ-204 exam and Azure Developer concepts.