Versioning .NET projects with Directory.Build.props
 Brian Gorman

Easily move between LTS and STS versions by using a versioning config file in your .NET projects
Using Directory Build Props
This is just going to be a very quick post. I've seen a lot of information lately on the social medias about people worried about using specific versions of .NET (i.e. 6 or 7 or other). I've seen a lot of worry about the LTS vs STS versions. Let's start there
LTS vs STS
What the heck are LTS and STS and why does it matter?
LTS => Long Term Support
LTS stands for Long-Term-Support, and this means that the version under LTS will typically be around for a "while". Where this used to be around ten years, has recently been more like two years since the invention of .NET Core. For example, just this year, .NET Core 3.1 went out of support, permanently. However, .NET 6 is in LTS => and will be supported through November 12, 2024 as an LTS version.
STS => Standard Term Support
STS stands for Standard Term Support. This means you get a "while" to use the project, but it will be retired more quickly. Again, this use to be a lot longer, and is now around 12-18 months of support. For example, .NET 5 also went out of support this year.
What's the big deal, really?
Why does it matter to you which one you choose? Well, there are a couple of reasons here.
-
Latest Features
Utilization of the most recent release (currently .NET 7) means you get all the latest features. This means you can use all the new C# features your heart desires. Sometimes, this is totally worth it. Sometimes, you can probably just wait, and it will be ok.
Even more consideration should be given here for the fact that you want to make certain you don't end up with a breaking change! Updating to the latest version also means you need to update your libraries, and, as you are likely painfully aware, things that worked in version 5 don't work in version 6 or 7. Even more painful here is the complete rework of the language to remove things like the
Startup.csfile in an ASP.NET Core project. Why did we really need to do that?And, for the love of everything that is holy, why would you EVER want to use TOP-LEVEL statements? Seriously, as a trainer of NEW DEVELOPERS, this is simply the worst thing that has ever happened to C#, in my humble opinion. Please just leave the namespace and class declarations and using statements alone (stepping off soap box now).
-
Availability for deployment in Azure
Another reason you need to update your version is because once something is out of support, you can likely count on it no longer working in Azure. You might be able to keep things in legacy mode for a bit, but you just never know when that luxury would come to an end, and you can't create a new App Service on .NET 3.1/5 at this point => Your only choices for .NET (Core) are .NET 6/7.
-
Security Concerns
A final consideration is security concerns. Simply put, versions out of support do not get patched if there are security holes and known exploits will always be an issue for a non-supported version.
So how do I upgrade?
One of the best things about the new .NET is that you can typically upgrade just by changing the target framework version in your project file. Along with that, you also can update the versions for any of your libraries using the NuGet package manager updates tab. This makes an upgrade mostly painless. With the changes in place, a typical upgrade can take just a few minutes. If you have to do some rework, however, you might have to rewrite some code or update SDK references and then modify the code to any new method calls if the old way of doing things is deprecated.
Why are you writing this post?
So this brings me to the whole point of this post. As a trainer, and as someone releasing a book later this year on AZ-204 through APress (look for it soon!), I have a strong need to be flexible and quick when it comes to sample projects. For example, I'm currently making the code for the book flexible enough to be .NET 6 or 7 with a simple configuration switch, and, hopefully, adding a switch to .NET 8 in November will be easy (without too much pain).
So when I see arguments about LTS vs STS online, I get it, but let me say this: I don't think it's as big of a deal as you are making it (maybe that's because 95% of my stuff is academic at this point).
However, I want to show you an example. To make this happen, you can simply use a file in your project called Directory.Build.props and you can set the versions in that file, then just reference them in your project.
Creating the sample project and props file
To illustrate this, let's make a very simple ASP.NET Core MVC project that leverages Entity Framework via SQL Server.
-
Create the project
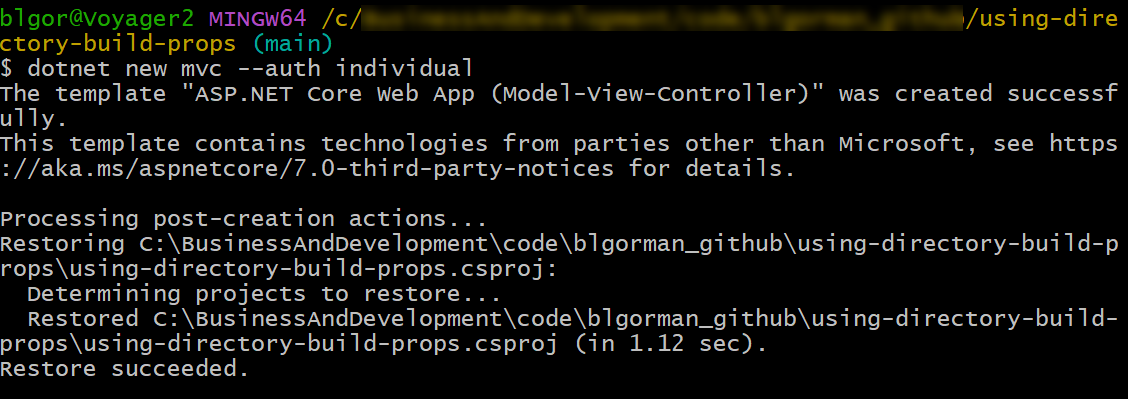
Open your .NET console to a folder of your choice and create the MVC project with the following command
dotnet new mvc --auth individual --use-local-db trueThis will create a project in your directory with your default version of .NET:
-
Review the project file
On my machine, using .NET 7, the following project file is created (i tweaked the secrets id to make it shorter):
<Project Sdk="Microsoft.NET.Sdk.Web"> <PropertyGroup> <TargetFramework>net7.0</TargetFramework> <Nullable>enable</Nullable> <ImplicitUsings>enable</ImplicitUsings> <UserSecretsId>9194ae11-5be5-475f-8716-69042e98049b</UserSecretsId> <RootNamespace>using_directory_build_props</RootNamespace> </PropertyGroup> <ItemGroup> <PackageReference Include="Microsoft.AspNetCore.Diagnostics.EntityFrameworkCore" Version="7.0.2" /> <PackageReference Include="Microsoft.AspNetCore.Identity.EntityFrameworkCore" Version="7.0.2" /> <PackageReference Include="Microsoft.AspNetCore.Identity.UI" Version="7.0.2" /> <PackageReference Include="Microsoft.EntityFrameworkCore.SqlServer" Version="7.0.2" /> <PackageReference Include="Microsoft.EntityFrameworkCore.Tools" Version="7.0.2" /> </ItemGroup> </Project>Note: The project doesn't create a solution but that is not important. Note how the various versions and target frameworks are listed above.
-
Create the
Directory.Build.propsfileOpen the folder in code (type
code .in the terminal) and create a file namedDirectory.Build.props. Alternatively use bash:touch Directory.Build.propsor PowerShell
"" > Directory.Build.props -
Open the folder in code to make it easy to work with going forward:
code .
Modify the props file
Create the props file to map all libraries and the .NET framework
-
Add the following code to the Directory.Build.props file (all of the version settings are from the *.csproj file as shown above)
<Project> <PropertyGroup> <TargetFrameworkVersion>net7.0</TargetFrameworkVersion> <MicrosoftAspNetCoreDiagnosticsEntityFrameworkCoreVersion>7.0.2</MicrosoftAspNetCoreDiagnosticsEntityFrameworkCoreVersion> <MicrosoftAspNetCoreIdentityEntityFrameworkCoreVersion>7.0.2</MicrosoftAspNetCoreIdentityEntityFrameworkCoreVersion> <MicrosoftAspNetCoreIdentityUIVersion>7.0.2</MicrosoftAspNetCoreIdentityUIVersion> <MicrosoftEntityFrameworkCoreSqlServerVersion>7.0.2</MicrosoftEntityFrameworkCoreSqlServerVersion> <MicrosoftEntityFrameworkCoreToolsVersion>7.0.2</MicrosoftEntityFrameworkCoreToolsVersion> </PropertyGroup> </Project> -
With those values set, modify the *.csproj file to reference these versions from the
propsfile<Project Sdk="Microsoft.NET.Sdk.Web"> <PropertyGroup> <TargetFramework>$(TargetFrameworkVersion)</TargetFramework> <Nullable>enable</Nullable> <ImplicitUsings>enable</ImplicitUsings> <UserSecretsId>9194ae11-5be5-475f-8716-69042e98049b</UserSecretsId> <RootNamespace>using_directory_build_props</RootNamespace> </PropertyGroup> <ItemGroup> <PackageReference Include="Microsoft.AspNetCore.Diagnostics.EntityFrameworkCore" Version="$(MicrosoftAspNetCoreDiagnosticsEntityFrameworkCoreVersion)" /> <PackageReference Include="Microsoft.AspNetCore.Identity.EntityFrameworkCore" Version="$(MicrosoftAspNetCoreIdentityEntityFrameworkCoreVersion)" /> <PackageReference Include="Microsoft.AspNetCore.Identity.UI" Version="$(MicrosoftAspNetCoreIdentityUIVersion)" /> <PackageReference Include="Microsoft.EntityFrameworkCore.SqlServer" Version="$(MicrosoftEntityFrameworkCoreSqlServerVersion)" /> <PackageReference Include="Microsoft.EntityFrameworkCore.Tools" Version="$(MicrosoftEntityFrameworkCoreToolsVersion)" /> </ItemGroup> </Project>Note: Notice how the versions are referenced now and now hard-coded version numbers are used in the volatile locations.
-
Run the project.
Run the project to prove it still works:
dotnet runYou should have no trouble seeing the project.
-
Open the project in Visual Studio by double-clicking the project file.
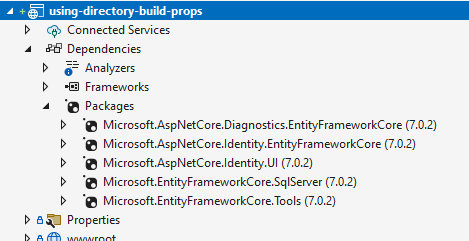
Open the project in Visual Studio to examine it further. This will create a solution file. Go ahead and save the solution file.
In the solution file, look at the references:
Close the solution file (save it if you didn't already)
Update to version 6
Currently I never ran any migrations. This makes it safe to downgrade to .NET 6 for the moment.
-
Change
Directory.Build.propstoDirectory.Build.dn7. -
Add a new
Directory.Build.propsfile to leverage .NET 6 on all the things:<Project> <PropertyGroup> <TargetFrameworkVersion>net6.0</TargetFrameworkVersion> <MicrosoftAspNetCoreDiagnosticsEntityFrameworkCoreVersion>6.0.13</MicrosoftAspNetCoreDiagnosticsEntityFrameworkCoreVersion> <MicrosoftAspNetCoreIdentityEntityFrameworkCoreVersion>6.0.13</MicrosoftAspNetCoreIdentityEntityFrameworkCoreVersion> <MicrosoftAspNetCoreIdentityUIVersion>6.0.13</MicrosoftAspNetCoreIdentityUIVersion> <MicrosoftEntityFrameworkCoreSqlServerVersion>6.0.13</MicrosoftEntityFrameworkCoreSqlServerVersion> <MicrosoftEntityFrameworkCoreToolsVersion>6.0.13</MicrosoftEntityFrameworkCoreToolsVersion> </PropertyGroup> </Project> -
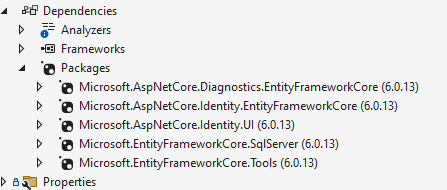
Open the solution again and review the dependencies
Notice how everything is .NET 6 now:
-
Perform migrations and run the project
Use the PMC (Package Manager Console) to apply database migrations with the .NET 6 (EFCore6) code:
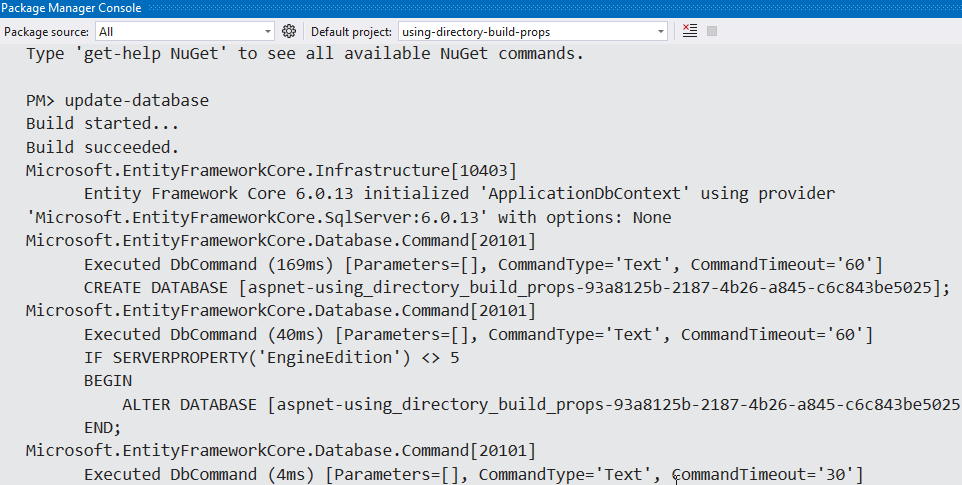
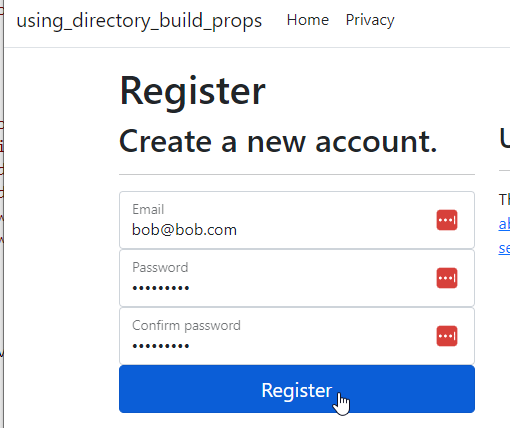
Run the project (f5) and Register a User
Note: The database is working and users are registering but the login partial is not working on this - and that might be due to creation in .NET 7 not .NET 6...

Change back
-
Close Visual Studio.
-
Change
Directory.Build.propstoDirectory.Build.dn6 -
Change
Directory.Build.dn7toDirectory.Build.props -
Run the project in .NET 7 version
Open the solution and run the project in .Net 7. Everything should be updated and should just work.
Try to log in the user.

Conclusion
Migration between STS and LTS can be done fairly easily, but there may be a few issues (login wasn't working on .Net 6 creating the project this way).
With all of that being said, using this approach is easy when things are trivial but that may not be the case in your environment. Either way, this approach may prove to be a quick and easy way to set your projects up for easy migration in the future!
Let me know what you think!